


Ensure that the power cord is firmly plugged into a grounded 120V outlet. If your model has a detachable power cord, ensure it is also firmly plugged into the back of the appliance. Try using a different outlet. Failure to follow these instructions may result in personal injury and/or property damage. Please visit https://www.instantpot.com/support/instant/resource
Wipe the control panel with a damp cloth and dry it completely to remove any residual food debris. If the control panel is still unresponsive, contact our customer care team.
NO - NEVER place your appliance on a stovetop, even if the stovetop is not in use. Place it on a stable, level surface, away from combustible material and external heat sources.
NO - DO NOT move your appliance while in use. Failure to follow these instructions may result in personal injury and/or property damage. Please visit https://www.instantpot.com/support/instant/resource
The skin should be pierced prior to cooking. When cooking meat with skin (e.g. sausage with casing), the skin can swell when heated. DO NOT pierce the skin while it is swollen; this could result in scalding personal injury and/or property damage. Please visit https://www.instantpot.com/support/instant/resource
After every use - Let the appliance cool to room temperature before cleaning or storage. Clean the appliance and all of its accessories after each use.
NO - DO NOT operate the appliance after it has been dropped or damaged in any manner.
NO - Use a grounded outlet only. DO NOT remove ground. DO NOT use an adapter. DO NOT use an extension cord.
Instant Pot® models sold for use in Canada and the USA are designed for 110–120 V outlets only.Do not use the appliance in electrical systems outside of the voltage range listed above, even with adapters or converters. For Instant Pot® appliances compatible with 220–240 V outlets, visit www.instantpot.co.uk or www.amazon.co.uk.
NO - To avoid electrical shock and damaging your appliance, DO NOT immerse power cord, plug, or the appliance in water or other liquid. DO NOT rinse the appliance under a tap.
NO - DO NOT leave the appliance unattended while in use.
The Instant Connect App can be found at the following links: IOS: https://apps.apple.com/us/app/instant-brands-connect/id1487494580 Android: https://play.google.com/store/apps/details?id=com.instantbrands.app&hl=en_CA&gl=US
DO NOT continue to operate the appliance. Contact Customer Care for assistance.
Please visit https://www.instantpot.com/support/instant/resource
Please visit https://recipes.instantpot.com/ http://www.youtube.com/@InstantPotOfficial or download our official recipe app "Instant Connect".
Check out our Where to Buy page for more information on in-store and online purchasing opportunities: instantpot.com/where-to-buy
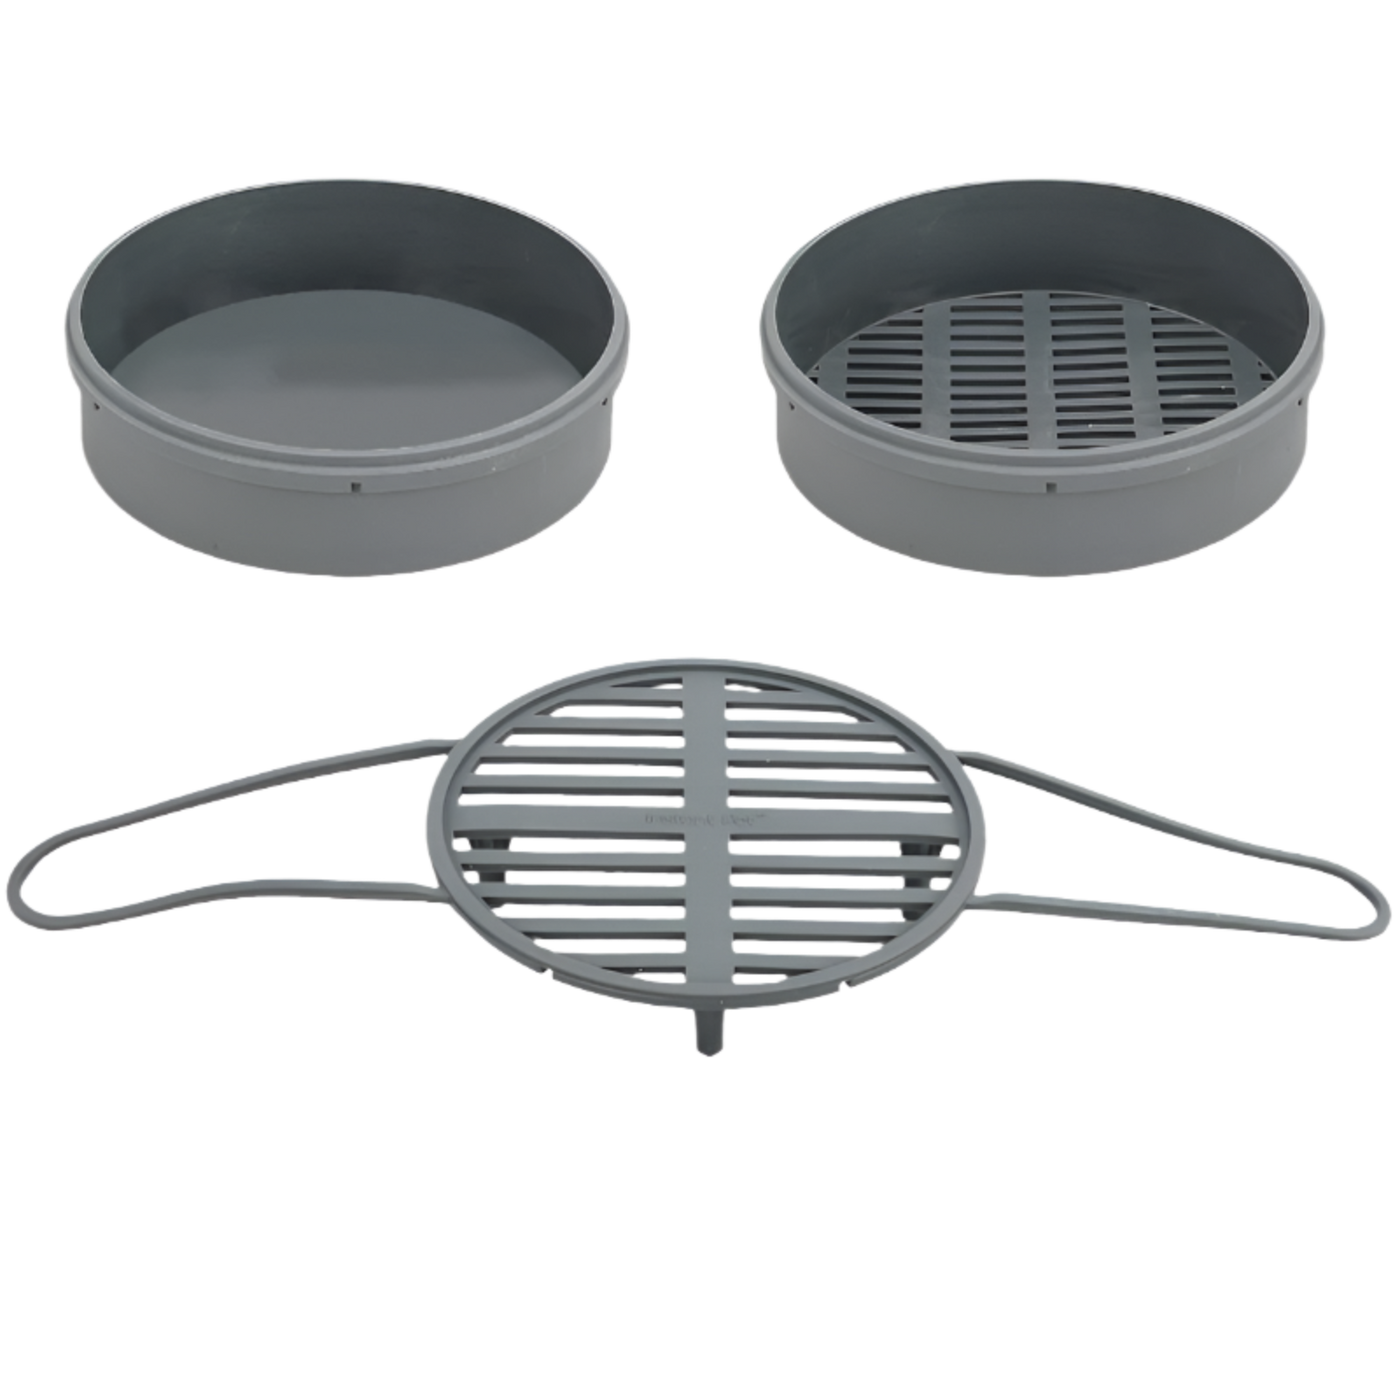
Everything you need to get started: motor, churning paddle, mixing bowl, control panel, base, and two (2) rolled ice cream paddles.
Let the appliance sit upright for at least 2 hours before first use. This allows the internal cooling system to settle after transport, ensuring optimal performance.
If your appliance has sat upright for 2 hours and is still not operating properly, please contact Consumer Care at 800-828-7280.
We are open Monday - Friday from 10:00am ET – 6:00pm ET, and will return your calls as soon as possible.
The appliance uses a built-in compressor to chill and freeze your mixture while automatically churning it to the correct consistency.
Smart programs control time, temperature, and movement so you don’t have to adjust manually.
You can make:
No! The built-in compressor eliminates the need for pre-freezing bowls or ingredients. You can start instantly.
Very! Just add your ingredients, select a program, and the appliance handles both freezing and churning automatically.
Rolled ice cream is the only program with a manual process, requiring you to spread, chop, and roll the mixture using the included paddles.
Most programs take about 20 minutes to produce a soft-serve consistency for 1 pint. Making 2 pints will take longer.
Timing may also vary slightly depending on ingredient temperature, composition, and selected function.
In addition to classic ice cream, you can prepare gelato, sorbet, frozen yogurt, non-dairy desserts, rolled ice cream, and fully customized recipes with mix-ins.
Absolutely! Use plant-based milk alternatives such as almond, oat, coconut, or soy in place of dairy.
The Non-Dairy program is designed to handle these variations.
Yes! Mix-ins can be added during the churning process or incorporated using the Mix program for even distribution.
You have three options:
This timing helps maintain texture while evenly distributing ingredients.
Do not exceed these limits. The mixture expands during freezing and churning, and overfilling can impact texture and performance.
The InstantChill™ Ice Cream Maker can produce up to 2 pints of finished product per batch.
The result for the Ice Cream program will be a soft-serve consistency immediately after the cycle ends. Textures and consistencies will vary per program.
For a firmer texture, transfer to a freezer-safe container and freeze further.
Common causes include:
To fix: run the cycle longer or freeze the finished product to firm it up.
This can happen if:
Try adjusting your inputs and allowing additional time.
Ice crystals form when there is excess water content in the mixture. Homemade ice cream also tends to have less air than commercial versions, which can affect texture.
If frozen too firm, let it sit at room temperature for 5–10 minutes before serving.
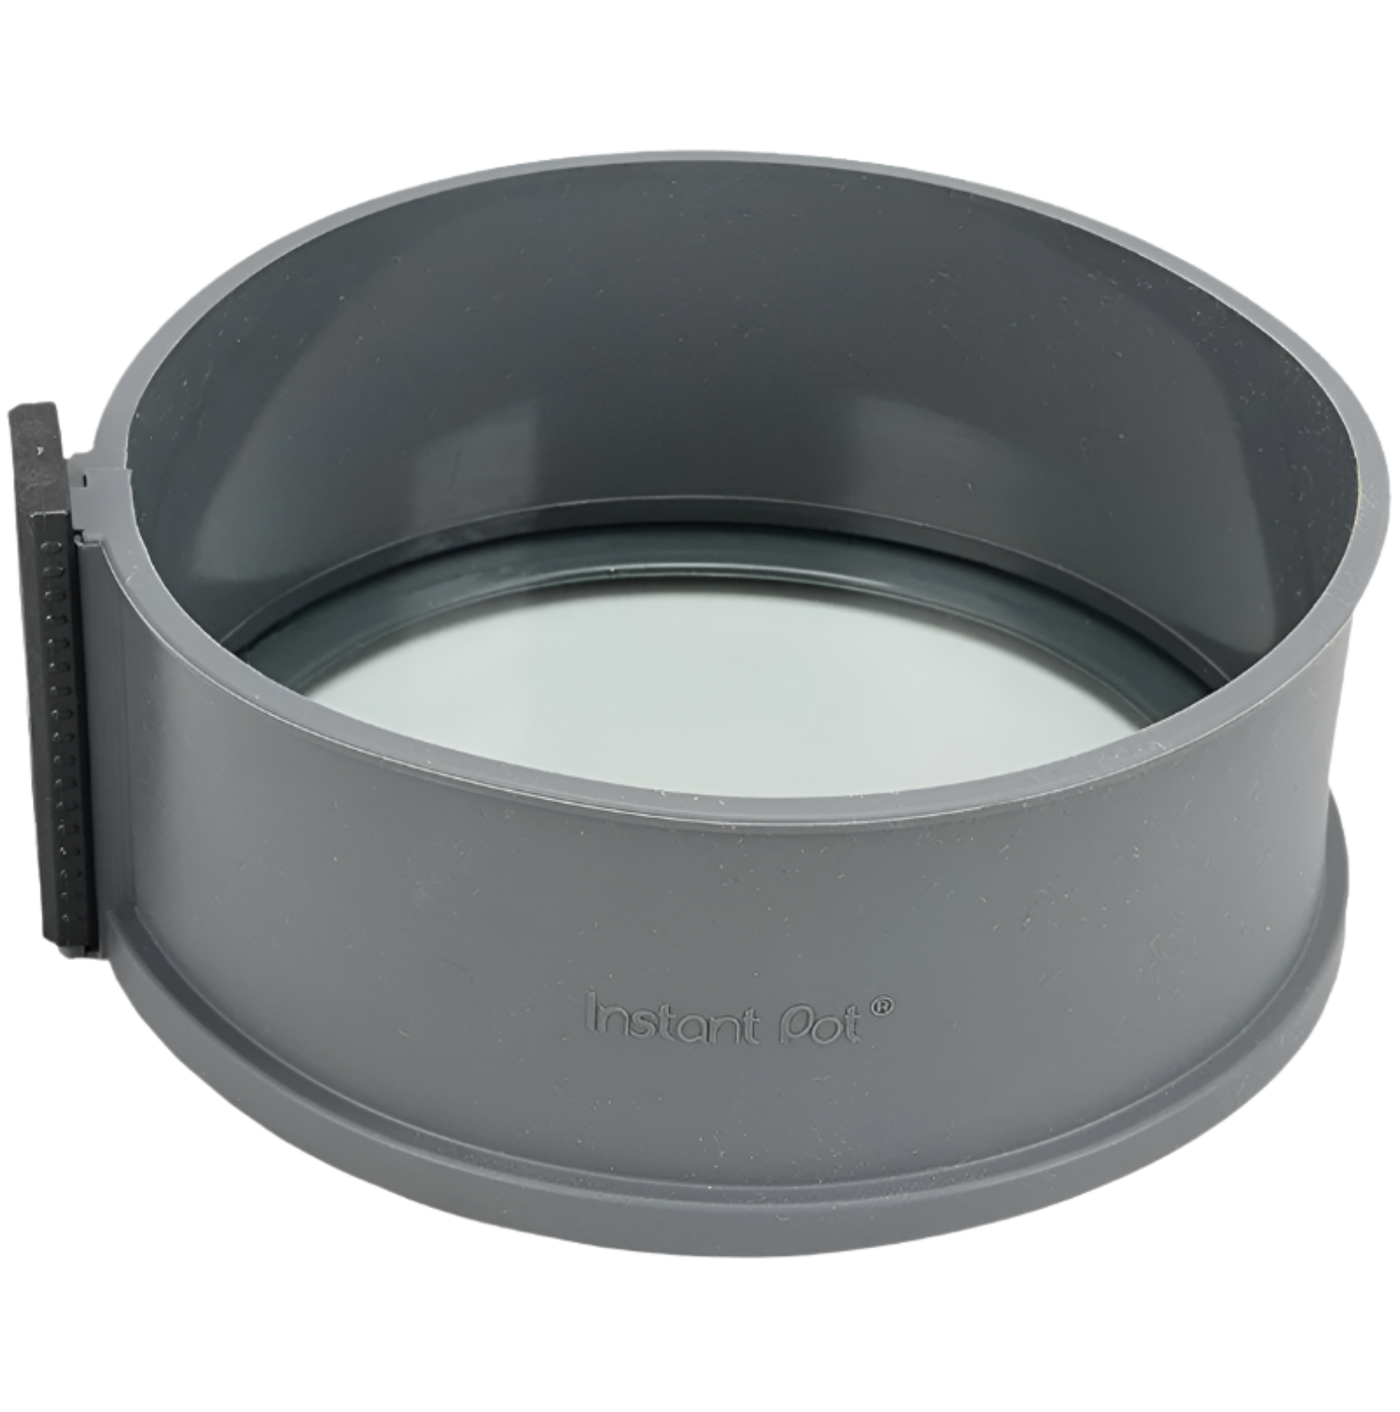
Before attaching, make sure the cold plate and the bottom of the mixing bowl are clean and completely dry.
Place the mixing bowl onto the Cold Plate on the Base, with the handles aligned diagonally, with handle on the right side closer to the Control Panel.
When properly installed:
We recommend transferring your finished ice cream to a separate airtight container and storing it in the freezer for best results.
Do not place the mixing bowl in the freezer. This can make the ice cream difficult to remove and may impact the bowl’s performance. Use a freezer-safe container instead.
The motor should never be washed in water. Please use a dry cloth to wipe it clean if necessary.
You will hear some sound during operation due to the compressor and churning mechanism. This is normal and comparable to a quiet countertop appliance.
It won’t ever disrupt your conversations or what’s on TV.
It has a footprint similar to a compact stand mixer, making it suitable for most kitchen countertops.
You can select between English and French.
1. When the display shows OFF or “-- --”, press and hold Start/Pause and Cancel for 3+ seconds to enter language selection mode.
2. Press the Start or Cancel buttons to toggle between language options
3. Press both Start and Cancel buttons within 10 seconds to confirm.
Of course! It gives you full control over ingredients, flavor, and texture, while letting you make fresh desserts on demand without preservatives or additives.
Always store the unit upright on a flat, level surface. This protects the internal cooling system and prevents performance issues the next time you use it.
These components are built into the internal structure of the appliance (exact locations to be specified). Do not cut, pierce, or crush any part of the unit. Damaging these areas can lead to fire hazards, explosions, or environmental harm.
YES - ALWAYS check for cuts, deformation and correct installation before cooking,as sealing rings stretch over time with normal use. If you notice stretching,deformation, or damage to your sealing ring, DO NOT use it.REPLACE the sealing ring every 12 to 18 months or sooner, and only useauthorized Instant Pot sealing rings.Failure to follow these instructions may cause food to discharge, which may leadto personal injury or property damage.
If you notice steam leaking for more than 3 minutes, Record a short video then turn the appliance off and unplug it from the wall.
Troubleshooting:
Float Valve: Ensure the Float Valve is properly attached and the silicone cap is in good condition. Replace the silicone cap if it is damaged or has small gouges before pressure cooking.
Sides of the lid: Please ensure the sealing ring is properly insatlled and seated around the metal wire rack on the underside of the lid. Replace the sealing ring if it appears stretched or damaged before pressure cooking.
Turn your inner pot upside down on a flat surface and ensure the rim is flush all the way around. Replace the inner pot if it appears to be warped or damaged before pressure cooking.
Plastic Molding: There may be moisture trapped inside the lid. This can occur if the lid is submerged. Allow the lid to dry completely before resuming cooking.
Steam Release Handle: Ensure the steam release handle is properly seated on the steam post and in the sealing position. Inspect the steam release handle for any damage. Replace the steam release handle if it appears to be loose on the steam post or has any damage before pressure cooking.
Steam Release Valve: Ensure the vent (quick release) button is in the upward (sealing) position before cooking.
If the liquid is water-based, make sure the burner is completely cool. Wipe the inside of the cooker base and heating element with a dry cloth to remove as much liquid as possible. Turn your Instant Pot upside down on a flat surface and let it air dry for 72 hours for any residual moisture to evaporate. Once completed, run the water test. If successful, happy cooking!
If the liquid is oil and/or fat based, do not attempt to use the appliance. Discontinue use and dispose of the appliance as per your municipalities regulations.
Ensure that the power cord is firmly plugged into a 120V outlet. If your model has a detachable power cord, ensure it is also firmly plugged into the back of the appliance.
This error code can occur if a substance was spilled onto the cooker base.
Water-based: Make sure the burner is completely cool. Wipe the inside of the cooker base and heating element with a dry cloth to remove as much liquid as possible. Turn your Instant Pot upside down on a flat surface and let it air dry for 72 hours for any residual moisture to evaporate. Once completed, run the water test. If successful, happy cooking!
Oil and/or fat based: Do not attempt to use the appliance. Discontinue use and dispose of the appliance as per your municipalities regulations.
Wipe the control panel with a damp cloth and dry it completely to remove any residual food debris. If the control panel is still unresponsive, contact our customer care team.
Please ensure you are following an approved Instant Pot recipe. Run the intial test to confirm your unit is operating as intended. If the test fails, contact our customer care team.
This is normal. The clicking sound is the heating element turning on and off to regulate internal temperature and/or pressure.
This might be happening for a few reasons:
1) The sealing ring is not installed correctly. Reposition the sealing ring. Make sure it is snug behind the metal wire rack ring.
2) The float valve is in the popped-up position. Remove and clean any residual food debris.
3) The contents are still hot. Set the valve to the venting, then lower the lid onto the base slowly, allowing heat to dissipate.
NEVER force the lid open after pressure cooking.
Ensure that all the pressure has been released. Release pressure according to the recipe. Set the valve to venting and only open the lid after the float valve has dropped and/or the display indicates it is ok to open the lid, and there is no pressure in the appliance.
Failure to follow the instructions in the user manual can lead to personal injury and/or property damage. Please visit: https://www.instantpot.com/support/instant/resources
Hot liquid can build up pressure in the pot. To release the pressure, activate the steam release valve. DO NOT open lid while it is still under pressure. Failure to follow these instructions may result in personal injury and/or property damage. Please visit https://www.instantpot.com/support/instant/resource
1) Not enough liquid in the inner pot. Ensure you are meeting the minimum requirements. Add thin, water-based liquid to the inner pot according to its size. Thicker sauces will require an additional cup of thin liquid.
2) Steam release handle/valve is not seated properly or is set to venting. Ensure the steam release handle/valve is set to sealing and is properly seated on the steam post (pushed down to its limits).
3) After sautéing, deglaze the inner pot.
We have a diverse lineup of products for all lifestyles and families. Check out our website for more information.
Before getting started, please review, save, and familiarize yourself with the important safeguards, use, and care information in the user manual. Failure to follow the instructions in the user manual can lead to personal injury and/or property damage.
Manuals and Resources - https://www.instantpot.com/support/instant/resources
Additionally, to help you get started with cooking, download our app, which is loaded with over 1,000 recipes, or access recipes through the web at https://recipes.instantpot.com/
iOS: https://apple.co/3JVbfUD Android: https://bit.ly/3HfRB3Z
The Instant Pot provides BPA free cooking.
The inner pot is made from food grade 304 (18/8) stainless steel, with no chemical coating, and is compliant with FDA food safety standards. Additionally, the inner cooking pot is dishwasher-safe.
The discoloration on the stainless steel cooking pot is called “rainbowing,” which can be caused by exposure to high heat, cooking starchy food (e.g. rice, pasta) or even detergent staining after hand or machine washing. This is common and normal in all stainless steel cookware.
To turn off your Instant Pot, press the cancel button and unplug from the power outlet when not in use and prior to cleaning.
We advertise the quart size as the complete volume of the inner pot, the volume when cooking will be a lower capacity.
When cooking with recipes with starchy or expanding foods (legumes, pasta, porridge, rice, soup, etc), DO NOT fill past the “1/2” marker in the inner pot. For all other recipes, DO NOT fill the inner pot past the “PC MAX” line. Failure to follow these instructions may result in personal injury and/or property damage. Please visit https://www.instantpot.com/support/instant/resource
Some models come with an extra sealing ring. There will be a clear sealing ring already installed in your lid. The extra sealing ring can be used to replace a stretched or damaged sealing ring. Alternatively, the extra sealing ring is handy for switching between different dishes. As an example, one could be used for sweeter dishes and the other one for more savory dishes.
Before cooking, ALWAYS check for cuts, deformation and correct installation, as sealing rings stretch over time with normal use. If you notice stretching, deformation, or damage to your sealing ring, DO NOT use it.
REPLACE the sealing ring every 12 to 18 months or sooner, and only use authorized Instant Pot sealing rings.
Failure to follow these instructions may cause food to discharge, which may lead to personal injury or property damage.
The display counts up to indicate how long it has been in the "Keep Warm" cycle. When the pressure cooking cycle finishes, the cooker beeps and automatically goes into the "Keep Warm" cycle. Some models display an "L" on the first digit, such as "L0:02", to indicate the "Keep Warm" cycle and time duration where 0:02 would be 2 minutes.
The display reads in hours and minutes (HH:MM). A cook time of four minutes would be shown as 00:04, while four hours would display as 04:00. Most pressure cooking programs can be set up to a maximum of 4 hours (or 04:00).
Low Pressure (on select models): 5.8 – 7.2 psi.
High Pressure: 10.2 – 11.6 psi
Max Pressure (on select models): 15 psi.
Automatic Keep Warm is the Keep Warm function that is activated after the cooking cycle is completed. This function will keep your food warm until you are ready to serve - up to 10 hours or until turned off!
You can disable this feature by pressing the "Keep Warm" button at anytime, before or during cooking.
YES - DO NOT fill over the PC MAX — 2/3 as indicated on the inner pot. When cooking foods that expand during cooking such as rice or dried vegetables, DO NOT fill the inner pot over the 1/2 line.
Overfilling may cause a risk of clogging the steam release pipe and developing excess pressure. Inappropriate use may result in injury and/or property damage.
No - If the silicone cap is damaged or missing, it must be replaced prior before pressure cooking. Visit -https://www.instantpot.com/shop/instant-pot/accessories. If you are unsure which float valve/silicone cap is compatible with your unit, contact our customer care team.
NO - DO NOT fill over PC MAX — 2/3 as indicated on the inner pot. When cooking foods that expand during cooking such as rice or dried vegetables, do not fill the inner pot over —1/2 line. Overfilling may cause a risk of clogging the steam release pipe and developing excess pressure. Inappropriate use may result in personal injury and/or property damage. Please reach out to our customer care team for any further assistance.
NO - DO NOT cover or obstruct the steam release valve/handle and/or float valve with cloth or other objects. Obstructing the steam release valve/handle and/or float valve is dangerous and may lead to personal injury and/or property damage.
DO NOT open the appliance until it has depressurized and all internal pressure has been released. If the float valve is still up and/or the lid is difficult to open, this indicates that the appliance is still pressurized — do not force it open. Any pressure in the appliance can be hazardous. Opening the appliance while it is still pressurized may lead to sudden release of hot contents and may cause burns or other injuries. Please contact Customer Care for further assistance.
To avoid scorching or scalding injury, be cautious when pressure cooking withmore than 1/4 cup (~2 oz / 60 mL) oil, oil-based sauces, condensed cream-basedsoups, and thick sauces. Add suitable liquid to thin sauces. Avoid recipes that callfor more than 1/4 cup (~2 oz / 60 mL) of oil or fat content. Failure to follow these instructions may result in personal injury and/or property damage and will void the warranty.
The Instant Pot can cook a wide variety of foods. For best results, we recommend using a trusted Instant Pot recipe.
Follow the cleaning guidelines outlined in your user manual and ensure you clean your Instant Pot and its parts after each use. The steam rack, and the lid and its accessories are top-rack dishwasher safe. The inner pot is dishwasher safe. To clean the body of your Instant Pot, wipe the inside of the outer pot as well as the condensation rim with a barely damp cloth. Allow them to dry completely before inserting the inner pot. Clean the Instant Pot’s base and control panel with a soft, barely damp cloth or sponge. Please ensure all parts are dry before storing them. Routinely inspect accessories and components and replace if you notice damage or wear.
Do not use the quick release method when cooking fatty, oily, thick, or high-starch foods (e.g. stews, chilis, pasta, and congee) or when cooking foods that expand when cooked (e.g. beans and grains). DO NOT place your face, hands or exposed skin over the steam release handle or float valve when the appliance is in operation or has residual pressure, and do not lean over the appliance when removing the lid.
A quick release, or manual release, occurs when the user switches the Instant Pot from 'sealing' to 'venting' and will cause a jet of steam to eject through the top of the steam release handle. During a natural release, cooking stops gradually. As the temperature within the multicooker drops, the Instant Pot depressurizes naturally over time. To release pressure naturally, the user must simply leave the Instant Pot set to 'sealing' untill all pressure is released. For a quicker natural release, ensure 'Keep Warm' is turned off.
Serve Together™ Smart Timing is a feature you activate on your Dual Action Multi-Cooker.
When activated, it staggers each pot's timing so your main and side land on the table at the same time without the juggling act.
Set up your first Smart Program in either pot by selecting Main Pot or Side Pot, choosing a program, and adjusting the settings (do not press Start).
Repeat the process for the second pot, then press Serve Together, followed by Start to run both programs.
The appliance will automatically time each pot so they finish together.
The Main Pot has a 4QT capacity, and the Side Pot has a 2QT capacity—ideal for everyday family meals.
The Main 4QT Pot includes Pressure Cook, Slow Cook, Steam, Sauté, and Warm functions.
The Side 2QT Pot offers White Rice, Brown Rice, Sushi Rice, Steam and Warm functions.
You can make up to 8 cups of cooked rice.
No, the Dual Action Multi-Cooker does not include a Yogurt function.
The lid is designed to capture excess condensation with an integrated condensation ring, eliminating the need for a separate collector.
Wipe the condensation ring down with a damp cloth to keep it clean and free of buildup.
Choose from English, French, German, Spanish, Italian, Danish, Dutch, Polish, Swedish, or Turkish.
We're working to make replacement parts available.
Please contact Consumer Care for the latest updates.
The Main Pot is made of stainless steel.
The Side Pot is made of aluminum with a non-stick ceramic coating that is PFAS- and PTFE-free.
Please refer to the product specifications for detailed dimensions.
We’re always adding new recipes.
Browse our recipe hub with 2,000+ recipes to explore, or download the Instant Connect app for more inspiration.
The Main Pot only cooks on high pressure. The Side Pot does not use pressure cooking.
NO - Please ensure you only use the included 6.5-quart inner pot.
NO - The appliance is designed to be used with the inner pot and the air fry cooking rack.
When in Standby mode (plugged in, not in use) press and hold the Temp button for 5 seconds until the display shows Temp Unit F or Temp Unit C.
Ensure the Lid Lock Switch is in the unlock position. Use the lid handle to lower the lid onto the cooker base, and gently press the lid down. Slide the Lid Lock Switch all the way over to the Lock position. You will hear the lid chime.
The minimum amount of watery liquid (water, broth, etc.) required for pressure cooking is 2 cups.
To install the Pressure Cooking Cover:
To remove the Pressure Cooking Cover:
The pressure setting is 10.2 - 11.6 psi with a working temperature of ~ 239°F to 244°F.
NO - The Duo Crisp with Ultimate lid only cooks on high pressure. The pressure setting ranges from 10.2 - 11.6 psi
The Sauté Levels are as follows:
To set the levels, please follow these steps:
Note - To change the time, after step 1, press Time and turn the Control Dial to adjust the time, then press the Control Dial to select.
NO - The sealing ring is permanently attached to the Pressure Cooker Cover and is not designed to be removed. If the sealing ring shows signs of wear or is damaged, please replace the lid. DO NOT use the lid with a damaged Sealing Ring.
The air fry/cooking rack, pressure cooking cover, and condensation collector are top-rack dishwasher safe. The inner cooking pot is dishwasher safe.
The Instant Pot Duo Crisp + Air Fryer can be used for pressure cooking, slow cooking, steaming, sautéing, warming food, air frying, roasting, baking, broiling, grilling and food dehydrator.
The Initial Test Run assists in quickly familiarizing yourself with the product and ensures it is operating as intended.
After you press Start, the unit displays On to indicate that the pre-heating phase has begun. When the pressure cooking process starts, the cooker beeps and counts down the cooking time.
NO - The Duo Crisp does not have a yogurt setting.
YES- The air fryer lid can be removed at any time during the cooking cycle
The pressure cooking function uses steam and high pressure to cook food quickly and evenly. It helps tenderize meats and reduces cooking times for many dishes.
The stainless steel inner pot, air fryer basket, and accessories are dishwasher safe. The outer housing can be wiped clean with a damp cloth. Make sure to refer to the user manual for specific cleaning instructions and ALWAYS ensure your unit is cool before cleaning
YES - The Instant Pot Duo Crisp allows you to adjust the cooking time and temperature for different recipes and preferences.
Leave at least 5" / 13 cm of space around the air fryer lid when in use. Do not place on anything that may block the vents on the bottom of the cooker base or on the air fryer lid.
NO - Always place the hot air fryer lid on the protective pad.
YES - Do not touch hot surfaces. Only use side handles for carrying or moving. Extreme caution must be used when moving the appliance containing hot liquids. Do not move the appliance when it is under pressure.
Should the unit emit black smoke when using the air fryer lid, press Cancel and unplug the appliance immediately. Wait for smoking to stop and wait until the unit cools before removing the lid, then clean thoroughly.
YES - ALWAYS check for cuts, deformation and correct installation before cooking, as sealing rings stretch over time with normal use. If you notice stretching, deformation, or damage to your sealing ring, DO NOT use it.
REPLACE the sealing ring every 12 to 18 months or sooner, and only use authorized Instant Pot sealing rings.
Failure to follow these instructions may cause food to discharge, which may lead to personal injury or property damage.
Yes - DO NOT fill over PC MAX — 2/3 as indicated on the inner pot. When cooking foods that expand during cooking such as rice or dried vegetables, DO NOT fill the inner pot over —1/2 line. Overfilling may cause a risk of clogging the steam release pipe and developing excess pressure. Inappropriate use may result in injury and/or property damage.
For Duo/Pro Crisp models - Ensure all pressure is released from the Instant Pot before removing the pressure cooking lid and adding the air fryer lid.
For Duo Crisp with Ultimate Lid - Ensure all pressure is released from the Instant Pot. The pressure cooking cover will be hot, use oven mitts to remove the pressure cooking cover. Close the lid and select your desired air fryer function.
YES - Please be sure to follow cooking instructions or a trusted recipe. Please visit https://recipes.instantpot.com/ http://www.youtube.com/@InstantPotOfficial or download our official recipe app "Instant Connect". Please not that steam escaping from the appliance when cooking frozen foods is normal.
NO - You don't need to add any oil for crispy results, if preferred, simply toss your food in a small amount of high smoke point oil (as little as 2 tablespoons) to create beautiful, crispy golden results. Always take the basket or tray out of the unit before adding any high smoke point oil.
Use this text to share the answer to the question with your customers.
YES - The fan will stay on for a few minutes to help your unit cool down and remove smoke from remaining food particles.
The Air Fryer basket is only top rack dishwasher safe.
YES - the cooking tray is diswasher safe.
NO - These bumpers help keep the tray in place and are perfectly safe for cooking. They should never be removed.
Do not make popcorn in your airfryer. Avoid foods dipped in batter, such as calamari, tempura shrimp, and buttermilk fried chicken. If you want to bread, go for an egg wash and breadcrumb coating. Most other things you cook in a conventional oven, can be cooked in your Vortex. For best results, always arrange foods in a single layer and cook in small batches.
YES - We recommend preheating your Air Fryer as most food items benefit greatly from the immediate high heat of a preheated cooking chamber. Preheating takes around 5 minutes! Be sure to preheat your unit if you are using a baking dish.
Please visit https://recipes.instantpot.com/ http://www.youtube.com/@InstantPotOfficial or download our official recipe app "Instant Connect"
YES - As long as your unit has the required function, you can follow the same recipe as temperature and cooking time do not change. You may need to adjust the amount of food according to the size of your Air Fryer.
NO - Please inspect regularly and refrain from using your appliance if you notice any damage. For warranty assistance, please reach out to our Customer Care team.
Additional trays and baskets are not available for purchase but please visit our online store for any updates and new releases.
NO - You cannot use these items in your Air Fryer
Use this text to share the answer to the question with your customers.
NO - You can cook directly on the tray. Do not use paper liners
Unplug the appliance. Please ensure you are allowing enough room around the appliance for air circulation. Let the Air Fryer cool down and please perform a test run. If our recommendation does not help, please reach out to our Customer Care team.
Unplug the appliance. Please check the power cord is firmly connected to the outlet. Try using a different outlet. If these recommendations do not help, please reach out to our Customer Care team.
This can be caused by immersing in water, using abrasive cleaners and/or metal utensils. Please reach out to our Customer Care team. We'll be happy to assist you!
Your Air Fryer is likely to be set to Celsius. To switch it to Fahrenheit, press the "Cancel" key and the display will show "OFF". Then hold down the "Temp" key for 5 seconds. One long beep indicates that the temperature unit has been changed.
Moisture on the door is not a functional problem and it will quickly evaporate when using the Air Fryer. Moisture on the glass door is often caused by submerging it in water. We suggest cleaning the door using a damp cloth and making sure it's fully dry before reattaching to the Vortex.
NO - The light bulb cannot be replaced. Please reach out to our Customer Care team to determine your warranty eligibility.
Please contact our customer care team for assistance.
Double-check that there is no tape, plastic, or any other packaging material attached to your appliance and please ensure you perform the initial test run detailed in the getting started guide. It may take a few dry runs for the smell to go away. If this does not help, please contact our Customer Care team for assistance.
The cooking tray is not designed to stay in place if the basket is inverted.
DO NOT continue to use your appliance. Please contact Customer Care for assistance.
NEVER pour oil into the cooking chamber. Failure to follow these instructions may result in personal injury and/or property damage. Please visit https://www.instantpot.com/support/instant/resource
DO NOT continue to operate the appliance. Contact Customer Care for assistance.
DO NOT continue to operate the appliance. Contact Customer Care for assistance.
NEVER place your appliance on a stovetop, even if the stovetop is not in use. Place it on a stable, level surface, away from combustible material and external heat sources.
Cooking trays and accessories are dishwasher safe. The removable air fryer basket should be hand washed with a damp cloth and mild dish soap. Allow the basket to air dry completely before reinstalling.
If needed, spray or toss food lightly with oil with a high smoke point (such as refined avocado oil, safflower oil, refined sunflower oil, refined peanut oil, canola oil and refined coconut oil). Only use non-aerosol, pump-style cooking spray before placing in the basket. Do not use pressurized, aerosol oil sprays, since they contain chemicals that can damage the non-stick finish of the cooking tray.
After you hit start, the air fryer will begin preheating. When the air fryer reaches your set temperature, it will prompt you to add your food.
Wipe the control panel with a damp cloth and dry it completely to remove any residual food debris. If the control panel is still unresponsive, contact our customer care team.
Check the rack for any damage and see if it is warped in anyway. Make sure the racks are situated properly in the oven. Please contact Customer Care if this does not help.
If within the retailers return window, please contact the retailer. For any assistance beyond this period, please contact our Customer Care team.
Please contact our Customer Care team for assistance. To clean, ensure the unit is unplugged. Wait for the unit to cool down. Wipe the control panel with a damp cloth and dry it completely to remove any residual food debris.
This can be caused by overheating. We recommend unplugging the unit to let it cool down. Please be sure to leave enough room around the unit for an even airflow though the vents. We suggest trying to plug the unit into another outlet and see if this makes a difference to eliminate the power source. If this does not help, please contact our Customer Care team for assistance.
Check to see if there is any food or grease debris that may be blocking the door hinges and preventing the door from shutting. If this does not help, please contact our Customer Care team for assistance.
Hold down the dial for 3 seconds and toggle between Celsius and Fahrenheit. If your unit has no dial, you may select any Smart Program, then touch and hold the temperature field for 3 seconds. The temperature scale changes to display in Celsius (°C) or Fahrenheit (°F).
Please check the rotisserie spit does not have any food or grease build up. Please be sure the food item on the Rotisserie spit is only up to 4lbs.
We recommend you reduce the cooking time and temperature by up to 25%.
We recommend cleaning the Cooking Chamber with dishwashing soap. Let it dry before cooking.
The air fry basket, cooking pan, crumb tray, oven rack, rotisserie lift, rotisserie spit and forks are dishwasher safe. If you are handwashing the accessories, we recommend soaking them in hot soapy water before cleaning to aid in removing stubborn grease residue. Please ensure all accessories are thoroughly dried before reusing.
To remove baked-on grease residue, apply a combination of baking soda and vinegar to the affected areas. Then wipe with a clean damp cloth or sponge. For particularly stubborn stains, allow the baking soda and vinegar mixture to sit on the affected area for several minutes before cleaning. Please allow any cleaned areas to completely air-dry before reusing.
Clean the outer body with a clean, soft, damp cloth or sponge . Wipe the exterior dry to avoid streaking.
The upper heating element of the Omni Toaster Oven does not glow/change color when in use. The lower heating element glows red when working.
We recommend that the total weight of the food be less than 10lb/4.5kg.
If the Omni's internal temperature is over 280F, the fan will continue to operate for 15 seconds to ensure that the motor is sufficiently cooled.
To turn the sound on and off please follow these steps:
Note: Error alerts cannot be turned off
To turn the sound on and off please follow these steps:
To reset the Omni to the factory settings, please follow these steps:
Do not overfill oven rack. If removing weight from the rack does not help, please contact Customer Care for assistance.
Do not continue to use your appliance. Please contact Customer Care for assistance.
NEVER pour oil into the cooking chamber. This could result in fire and/or personal injury.
Leave at least 5" / 13 cm of space around the air fryer lid when in use. Do not place on anything that may block the vents on the bottom of the cooker base or on the air fryer lid.
The Omni Cuisine with Air Fryer 18L weighs 23lbs and the dimensions are 17x17x14.
The weight is 26lbs, dimensions are 17x16x14
NEVER place your appliance on a stovetop, even if the stovetop is not in use. Place it on a stable, level surface, away from combustible material and external heat sources.
You can add a non-connected appliance in the My Kitchen section of the Instant Connect™ App. This will also tailor recipes on the home screen specifically to your appliance. Or try searching "Instant Pot" or "Air Fryer" in the search field.
Yes! The same Pro Plus pot can be used on different devices and even if members of the household have both Android & iOS devices.
Please note that users must use the same account associated with their connected devices.
The Sauté feature is disabled for safety as this function operates at high temperatures.
When the pot is ready to pair, the WiFi icon will flash white. While it is paired and connected to the app, it will turn solid white. If the appliance loses WiFi connection or internet connectivity, the WiFi icon will flash amber. When the appliance is not connected to WiFi, the icon will be solid amber.
Additionally, WiFi can be disabled on the appliance by pressing the WiFi button for 8 seconds. WiFi can be reactivated again by pressing the WiFi button for 2 seconds.
The new Instant Connect™ App update brings new features and improvements that will enhance your cooking experience. The app is currently compatible with Android versions 10 to 14. As well as iOS versions 15 & 16.
If you are currently using an Android device and would like to use our new app, please make sure that your device is running the latest Android version. You can check this by going to your device settings and selecting the "System" option. From there, select "System Update" to check for any available updates.
Check Spam or Junk Folder:
Sometimes, verification emails can be mistakenly filtered as spam or junk mail by your email provider. Please check your spam or junk folder in your email account to see if the verification email landed there. If you find it, make sure to mark it as "not spam" to prevent future emails from being filtered.
Wait for a few minutes:
Occasionally, there can be a slight delay in receiving verification emails. We recommend waiting for a few minutes and checking your inbox again to see if the verification email has arrived.
Lastly, we would like to clarify that the verification email will come from our application development company, Fresco. Kindly check your inbox, spam/junk folder, and follow the steps mentioned above to ensure the email is received successfully.
Saved recipes can be found under "My Cookbook," located at the bottom of the screen.
If they're not there, we recommend uninstalling the Instant Connect™ App from the current device. Once uninstalled, please download the new Apple version or Android version of the Instant Connect™ App from the following links:
To help you further troubleshoot the issue, we would recommend the following steps:
Double-Check Your Login Credentials:
Ensure that you are using the correct email address associated with your account and that the password you entered during the password reset matches the new password you set. Sometimes, small typos can prevent successful login attempts.
Clear App Cache and Data:
Sometimes, cached data can interfere with the login process. We recommend clearing the cache and data for the Instant Connect™ App on your device. You can usually do this by going to your device's settings, selecting "Apps" or "Application Manager," finding the Instant Connect™ App, and choosing the options to clear cache and data.
Uninstall and Reinstall the App:
If clearing the cache and data doesn't resolve the issue, try uninstalling the app from your device and reinstalling it from the official app store. This process ensures you have the latest version of the app and can help resolve any software-related issues. We recommend uninstalling the Instant Connect™ App from the current device. Once uninstalled, please download the new Apple version or Android version of the Instant Connect™ App from the following links:
You can toggle notifications on and off by clicking 'Notifications' under your profile.
Your cart is currently empty.