

Instant™ Product Manuals and Resources
Instant™ User Manuals
Instant Pot® Series
Instant Pot® Series
Instant Pot® Specialty Products
Instant Pot® 6 Qt Multi-Use Pressure Cooker
Instant Pot® 8 Qt Multi-Use Pressure Cooker
Instant Pot® Multi-Use Pressure Cooker and Air Fryer
Instant Pot® 6 Qt Easy 3-in-1 Slow Cooker, Pressure Cooker, and Sauté Pot
Instant Pot® Aura™
Instant Pot® Cuisine Crisp
Instant Pot® Duo™
Instant Pot® Duo™ Sous Vide
Instant Pot® Duo™ Evo Plus
Instant Pot® Duo Nova
Instant Pot® Duo Nova Plus
Instant Pot® Opal™ Pro
Instant Pot® Duo Gourmet
Instant Pot® Gem™
Instant Pot® Lux™
Instant Pot® Max™
Instant Pot® Rio™
Instant Pot® Rio™ Plus 7.5 Quart
Instant Pot® Smart WiFi™
Instant Pot® Smart Bluetooth®
Instant Pot® Ultra™
Instant Pot® Duo Crisp™
Instant Pot® Duo Crisp with Ultimate Lid
Instant Pot® Duo Crisp with Ultimate Lid with Wifi
Instant Pot® Crisp™
Instant Pot® 6QT Crisp - 11 in 1
Instant Pot® Air Fryer Lid
Instant Pot® Pro
Instant Pot® Pro Plus
Instant Pot® Viva™
Instant™ Air Fryers and Toaster Ovens
Instant™ Air Fryers and Toaster Ovens
Instant™ Cuisine 18L Cuisine Air Fryer and Toaster Oven
Instant™ Cuisine 18L Cuisine Air Fryer and Toaster Oven
Instant™ Essentials™
Instant™ Essentials 4-quart Air Fryer
Instant™ Vortex™ Slim
Vortex Slim Chef Series 6QT Air Fryer
Instant™ Vortex™
Instant™ Vortex™ Mini 2 Quart Air Fryer
Instant™ Vortex™ 4 Quart Air Fryer
Instant™ Vortex™ 5.7 Quart Air Fryer with Grilling Accessories
Instant™ Vortex™ 5 Quart ClearCook Air Fryer
Instant™ Vortex™ Series 6 Quart Air Fryer V1
Instant™ Vortex™ Series 9 Quart Air Fryer
Instant™ Vortex™ 9 Quart Air Fryer with VersaZone™ Technology
Instant™ Vortex™ 10 Quart Air Fryer Oven V1
Instant™ Vortex™ Plus
Instant™ Vortex™ Plus 4 Quart Air Fryer
Instant™ Vortex™ Plus 5.7 Quart Air Fryer
Instant™ Vortex™ Plus 6 Quart Air Fryer
Instant™ Vortex™ Plus 6 Quart Air Fryer with ClearCook
Instant™ Vortex™ Plus 6 Quart Air Fryer with ClearCook and OdorErase
Instant™ Vortex™ Plus 8 Quart Dual Air Fryer with ClearCook
Instant™ Vortex™ Plus 10 Quart Air Fryer V1
Instant™ Vortex™ Pro
Instant™ Zest™ Rice & Grain Cookers
Instant™ Zest™ Rice & Grain Cookers
Instant™ Ace™ Cooking and Beverage Blenders
Instant™ Ace™ Cooking and Beverage Blenders
Instant™ Accu™ Sous Vide
Instant™ Accu™ Sous Vide
Instant™ Indoor Grill
Instant™ Indoor Grill
Instant™ Precision and Standalone Dutch Ovens
Instant™ Precision and Standalone Dutch Ovens
Instant™ Air Purifiers
Instant™ Air Purifiers
Instant™ Stand Mixers
Instant™ Stand Mixers
Troubleshooting Videos & Guides
Videos: Instant Pot® Series
Videos: Instant Pot® Series
Instant Pot® Pro - Getting Started
General Care of your Instant Pot®
Instant Pot®- Duo Sealing Ring
How to Sterilize in Your Instant Pot®
Hidden Features on your Instant Pot®
Instant Pot® Duo Plus- Eggy Perfection
Instant Pot® Pro Series
Instant Pot® Pro Plus – Connecting your Android Device - with Guided Audio
Instant Pot® Pro Plus – Connecting your IOS Device - with Guided Audio
Videos: Instant™ Kettles, Coffee Makers and Milk Frothers
Videos: Instant™ Kettles, Coffee Makers and Milk Frothers
Instant™ Recipe Booklets
Welcome to the World of Instant™ Cooking!
Welcome to the World of Instant™ Cooking!
Instant™ Cooking Timetables
Timetables - Electric Pressure Cookers, Air Fryer Lids & Sous Vide
Timetables - Electric Pressure Cookers, Air Fryer Lids & Sous Vide
Instant™ Comparison Tables
Comparison Tables
Comparison Tables
Safety Mechanisms
Safety Mechanisms - Duo, Duo Plus, Lux, Nova Plus and Viva
Safety Mechanisms - Duo, Duo Plus, Lux, Nova Plus and Viva
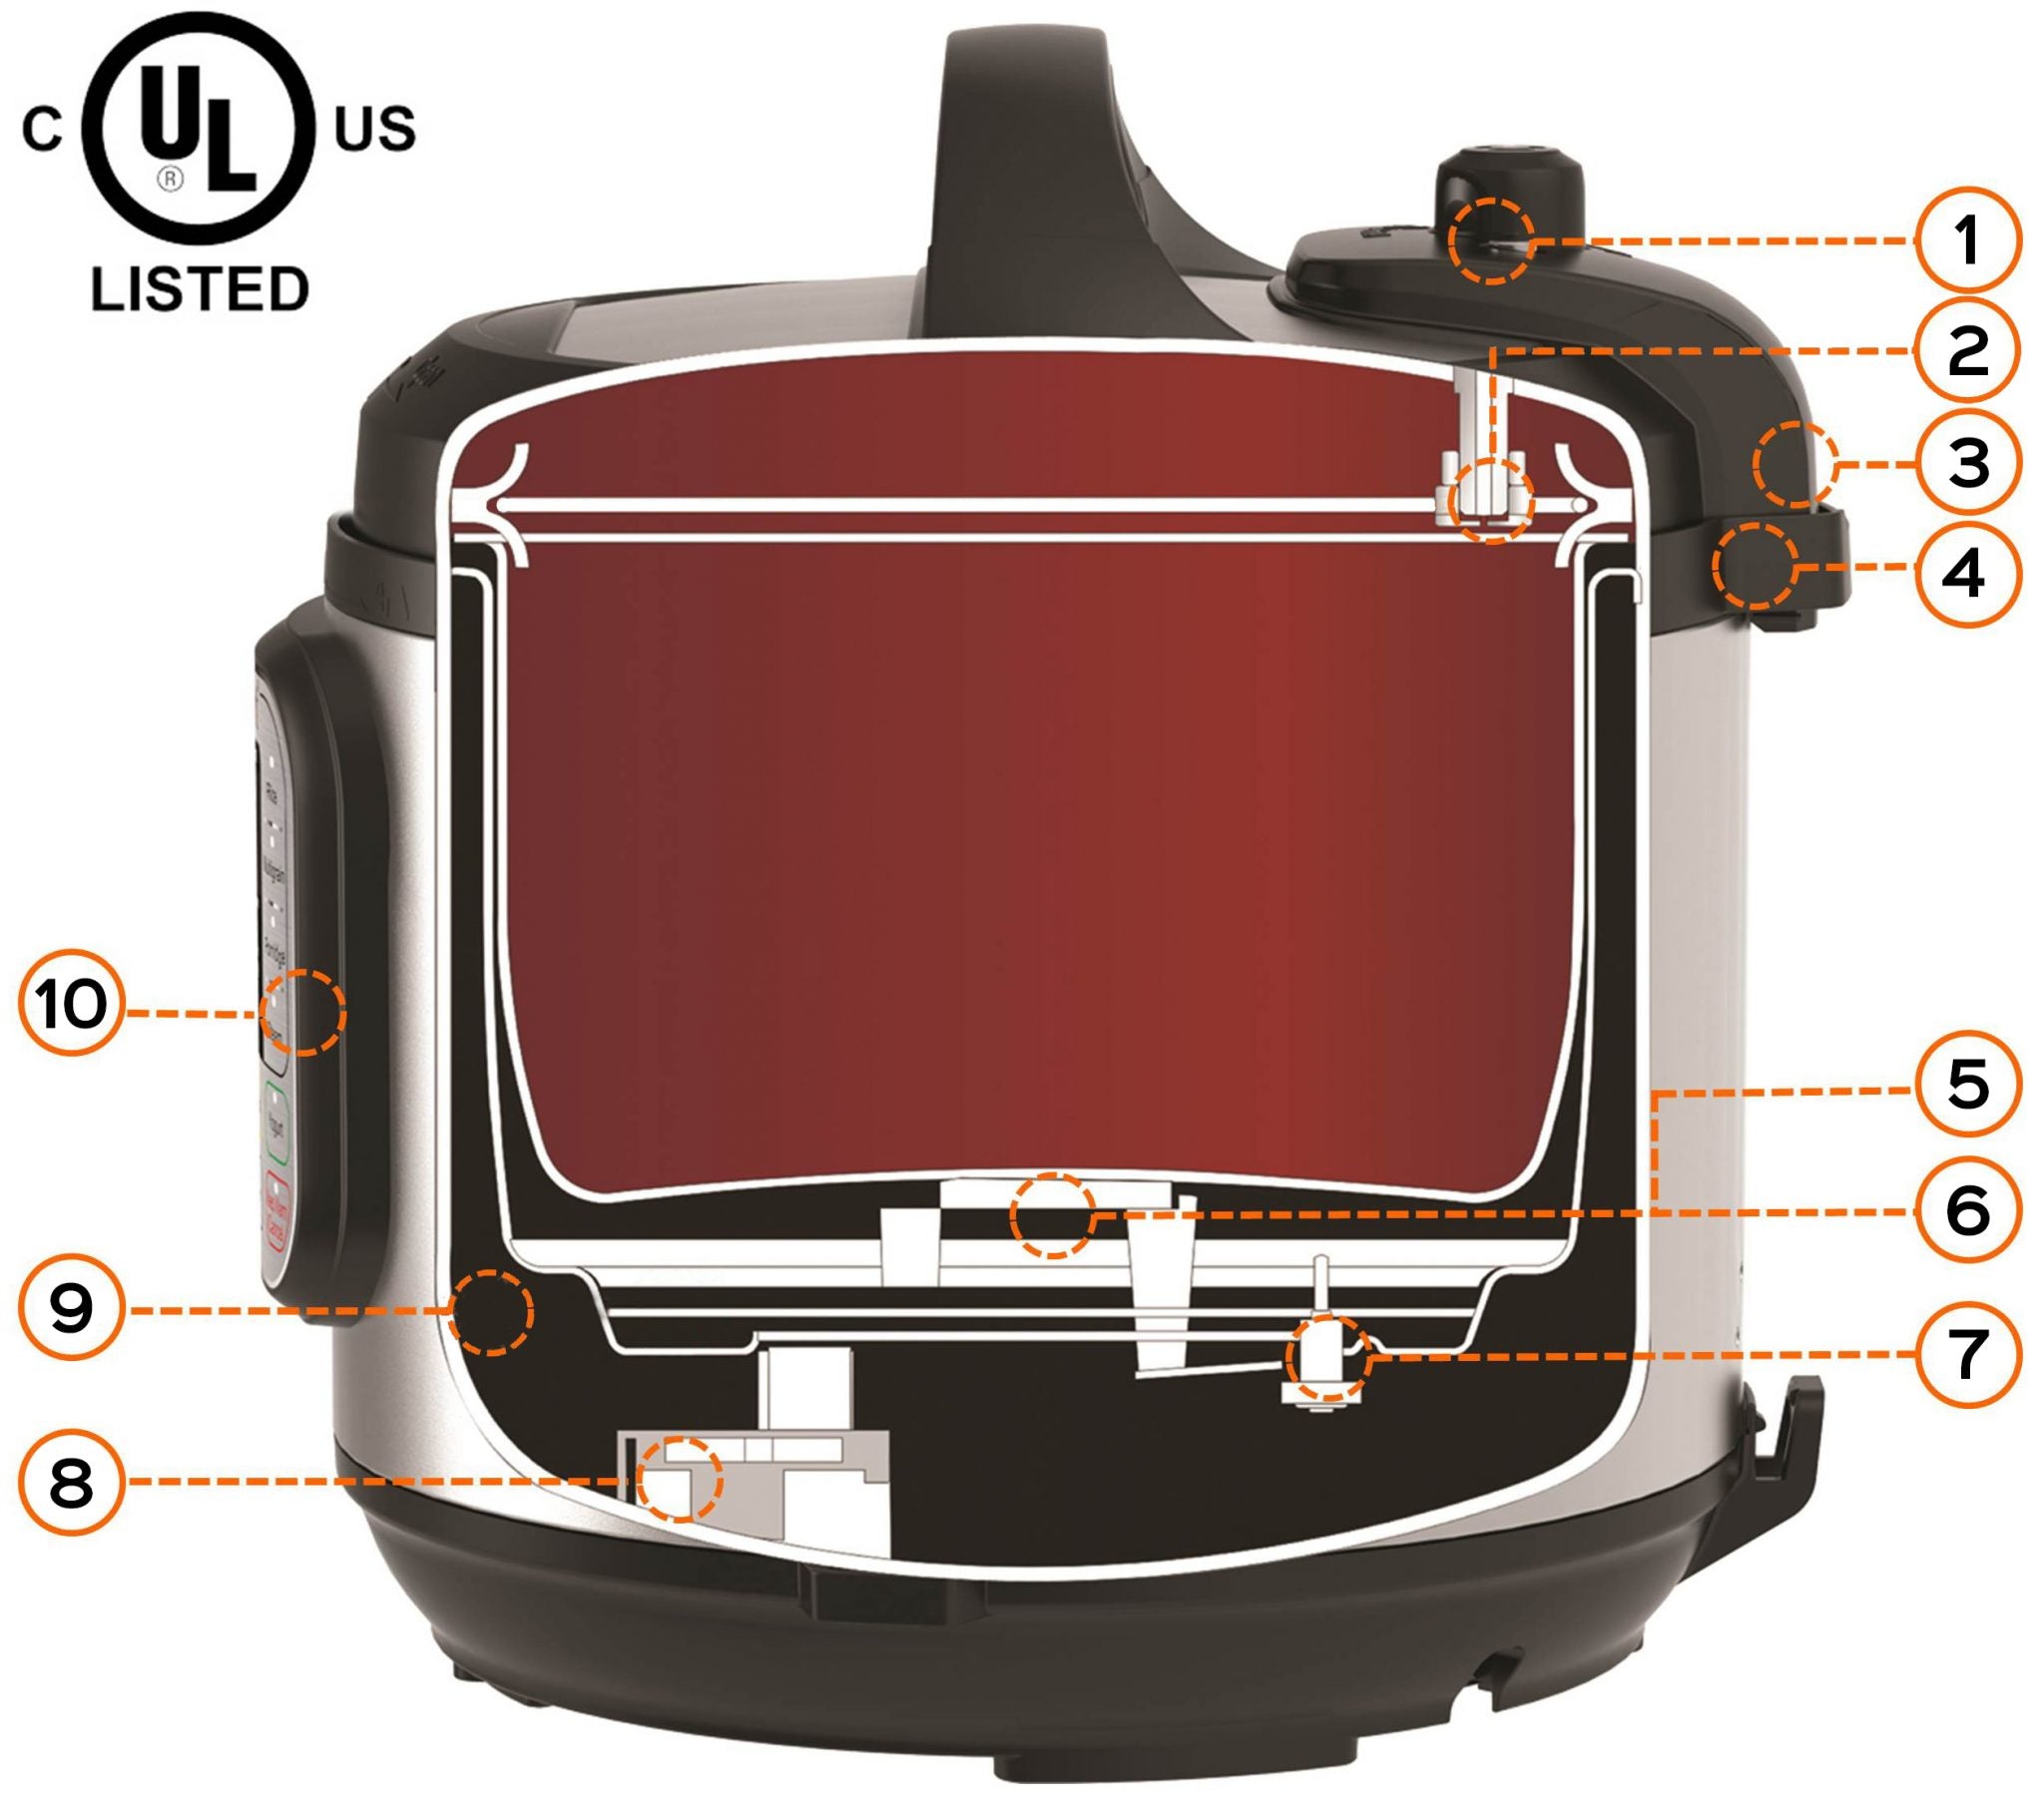
Instant Pot® is designed with 10 Safety Mechanisms to eliminate many common errors which may cause harm or spoil food. The following Safety Mechanisms are applicable to: Lux 6-in-1, Duo 7-in-1, Duo Plus 9-in-1 and Smart Bluetooth.
- Steam Release – Releases excess pressure by venting steam through the steam release valve/handle.
- Anti-Block Shield – A stainless steel cover which prevents food particles from entering the steam release pipe, reducing the risk of blockages.
- Safety Lid Lock – When cooker is pressurized, the lid will automatically lock to prevent opening the cooker. Do not attempt to force the lid open while the cooker is pressurized.
- Lid Position Detection – If the lid is not in a safe position for pressure cooking, the cooker will not allow cooking to begin.
- Automatic Temperature Control – Regulates heating to ensure the inner pot remains within a safe temperature range, based on the program.
- Overheat (Burn) Protection – Overheating may occur if:
• After Sautéing, inner pot has not been deglazed— food is stuck to the bottom
• The pressure cooker is being operated without sufficient cooking liquid
• The inner pot is not making full contact with the heating element
• The inner pot encounters a heat distribution issue, such as when starch accumulates on the bottom of the inner pot.
The cooker will reduce the risk of burning food by lowering the heat output. - Automatic Pressure Control – Maintains working pressure levels. Suspends heating if pressure exceeds pressure level limits.
- Electrical fuse – Cuts off power if the electrical current exceeds safety limits.
- Thermal Fuse – Cuts off power if the internal temperature exceeds safety limits.
- Leaky Lid Detection – If there is steam leakage from the lid (such as, sealing ring not installed, or steam release handle being in “Venting” and not “Sealing” position) the cooker will not pressurize. Loss of steam may cause food to burn. The cooker monitors the pre-heating time and lowers heat output if working pressure is not reached within 40 minutes.
Safety Mechanisms - Instant Pot® Ultra
Safety Mechanisms - Instant Pot® Ultra
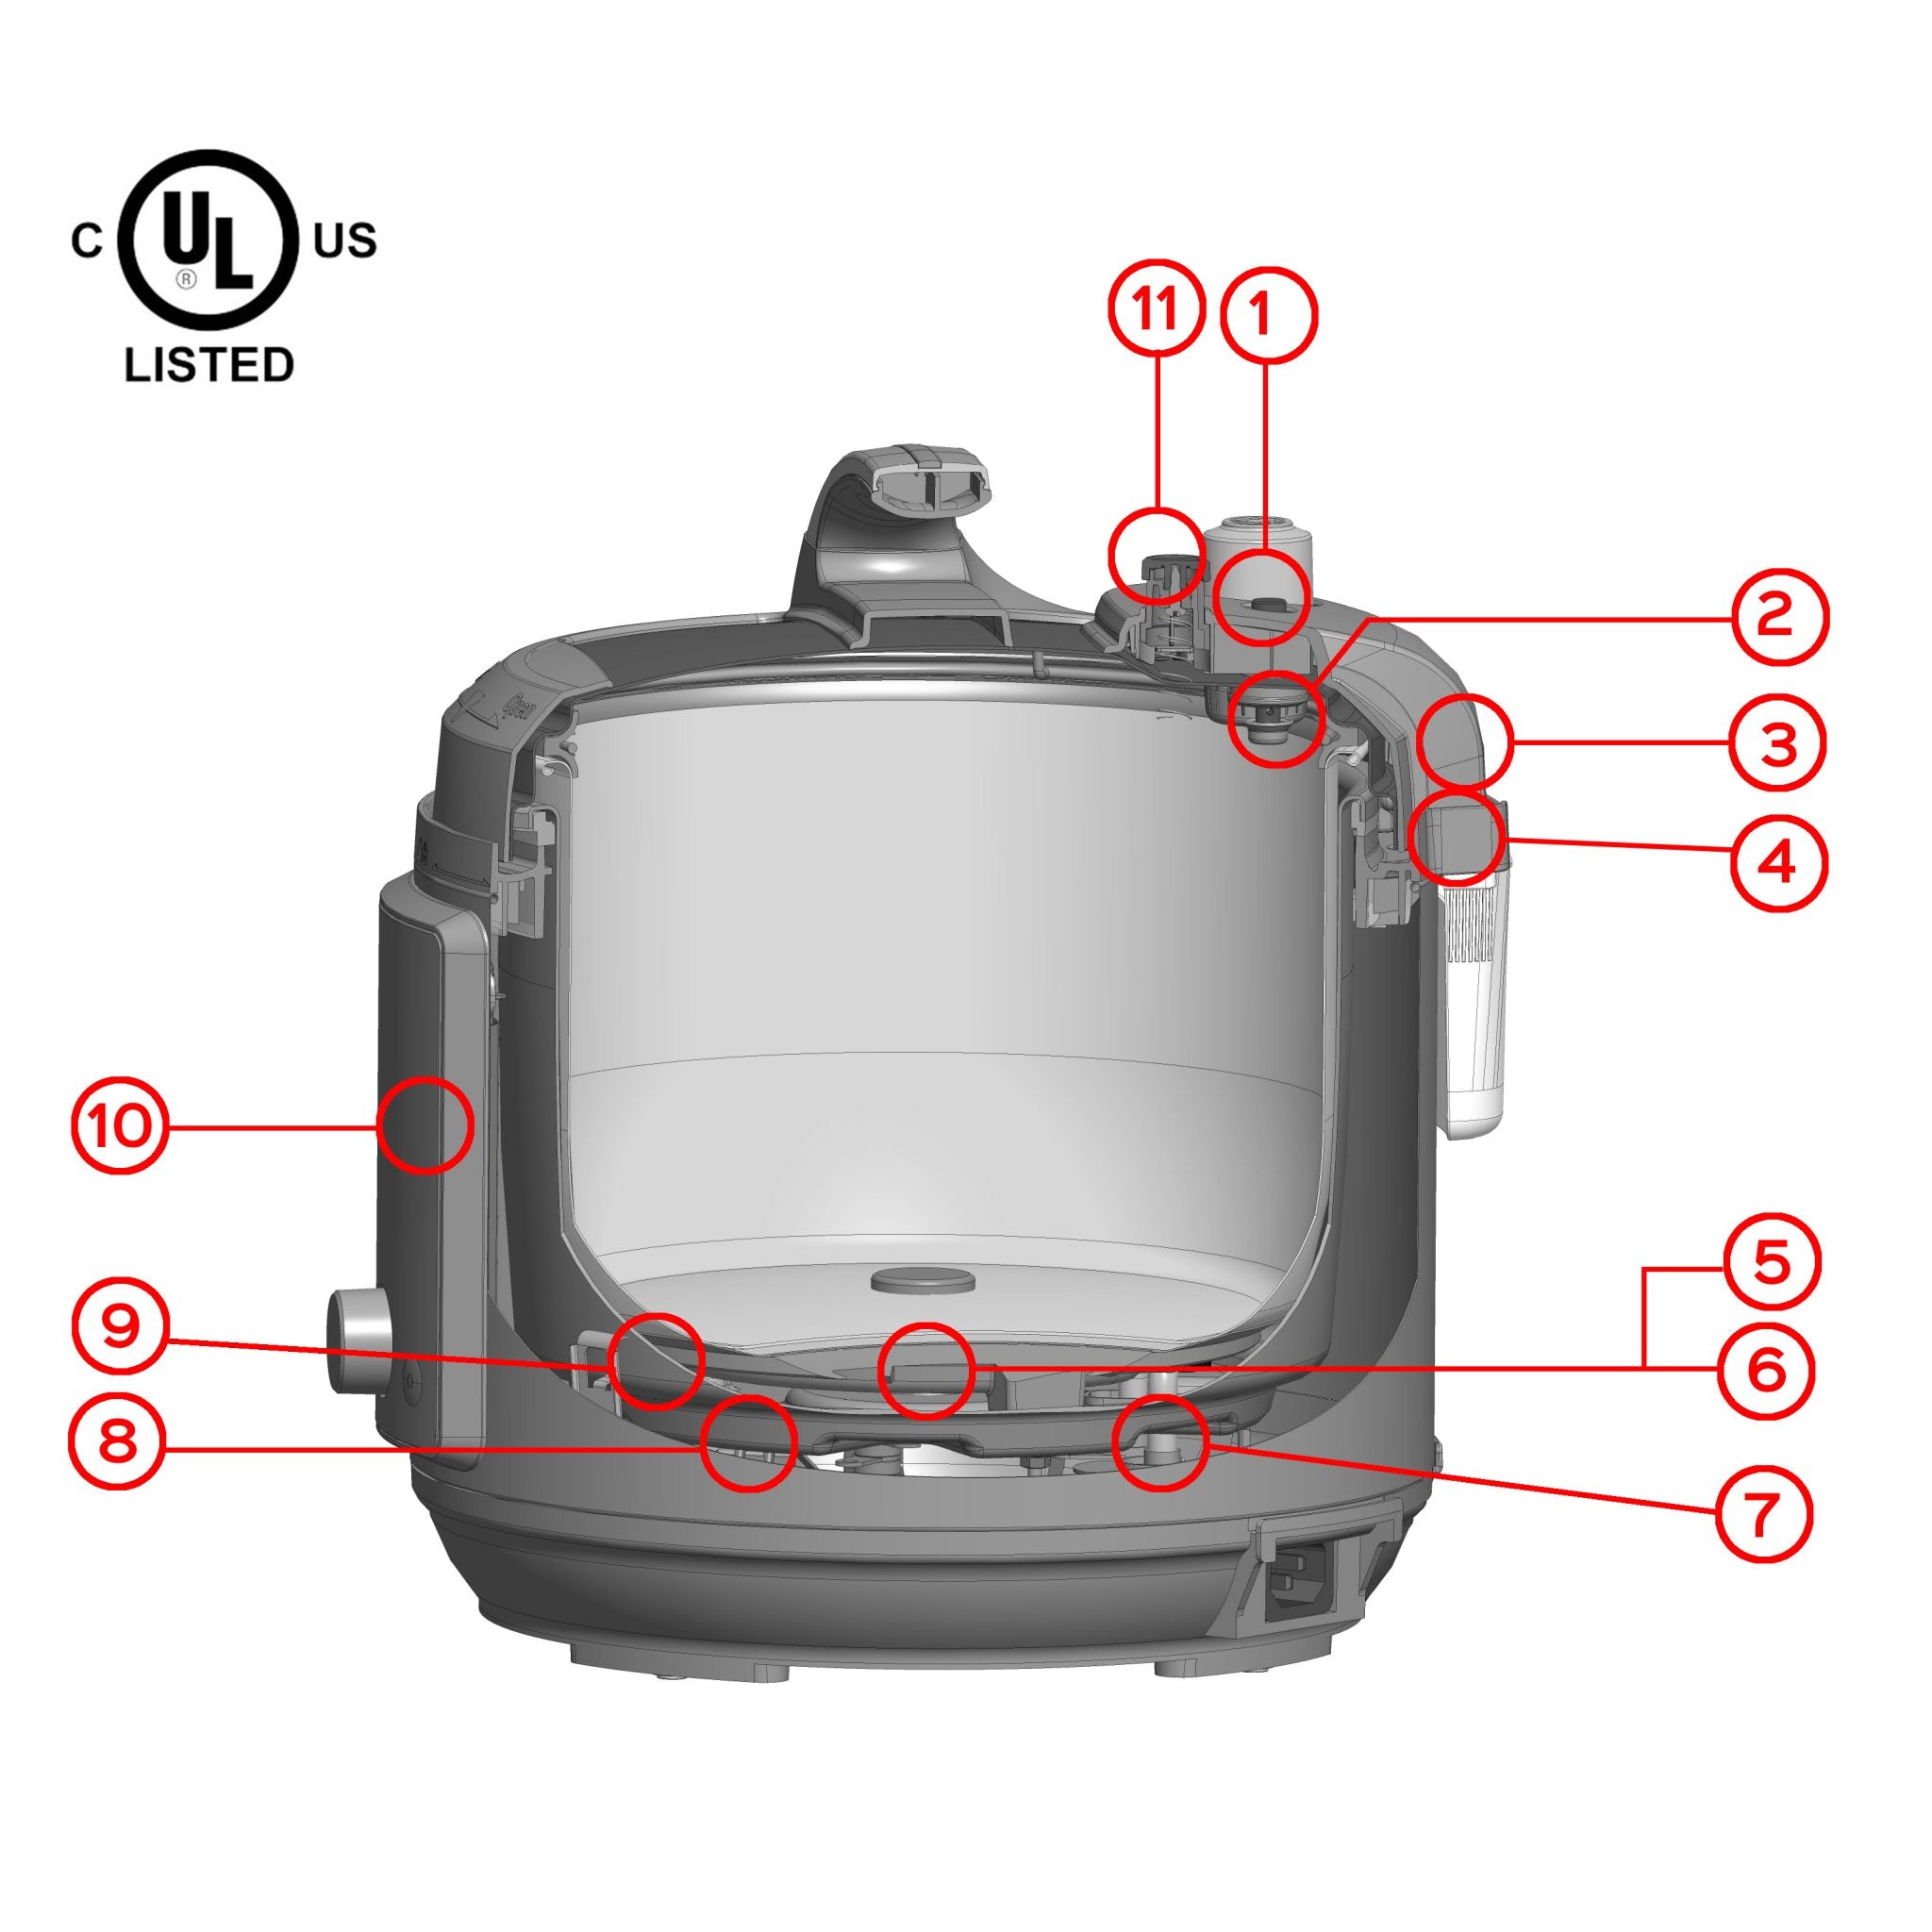
Instant Pot® is designed with 11 Safety Mechanisms to eliminate many common errors which may cause harm or spoil food. The following Safety Mechanisms are applicable to the Ultra Series.
- Steam Release – Releases excess pressure by venting steam through the steam release valve/handle.
- Anti-Block Shield – A stainless steel cover which prevents food particles from entering the steam release pipe, reducing the risk of blockages.
- Safety Lid Lock – When cooker is pressurized, the lid will automatically lock to prevent opening the cooker. Do not attempt to force the lid open while the cooker is pressurized.
- Lid Position Detection – If the lid is not in a safe position for pressure cooking, the cooker will not allow cooking to begin.
- Automatic Temperature Control – Regulates heating to ensure the inner pot remains within a safe temperature range, based on the program.
- Overheat (Burn) Protection – Overheating may occur if:
• After Sautéing, inner pot has not been deglazed— food is stuck to the bottom
• The pressure cooker is being operated without sufficient cooking liquid
• The inner pot is not making full contact with the heating element
• The inner pot encounters a heat distribution issue, such as when starch accumulates on the bottom of the inner pot.
The cooker will reduce the risk of burning food by lowering the heat output. - Automatic Pressure Control – Maintains working pressure levels. Suspends heating if pressure exceeds pressure level limits.
- Electrical Fuse – Cuts off power if the electrical current exceeds safety limits.
- Thermal Fuse – Cuts off power if the internal temperature exceeds safety limits.
- Leaky Lid Detection – If there is steam leakage from the lid (such as, sealing ring not installed, or steam release handle being in “Venting” and not “Sealing” position) the cooker will not pressurize. Loss of steam may cause food to burn. The cooker monitors the pre-heating time and lowers heat output if working pressure is not reached within 40 minutes.
- Quick Release Button – For safer handling of steam release, press the “Quick Release Button” on the lid to depressurize the cooker. It automatically resets to the “Sealing” position when opening or closing the lid.
Safety Mechanisms - Instant Pot® Smart WiFi
Safety Mechanisms - Instant Pot® Smart WiFi
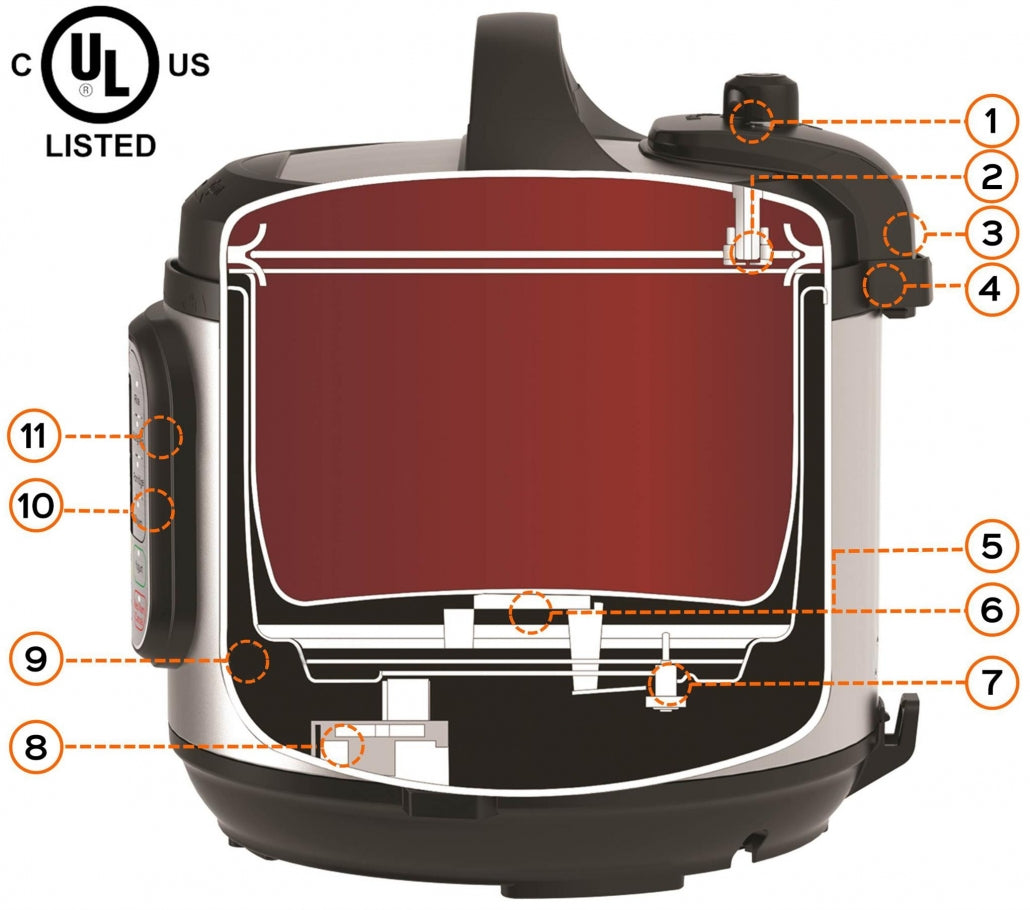
Instant Pot Smart WiFi is designed with 11 Safety Mechanisms to eliminate many common errors which may cause harm or spoil food.
- Steam Release – Releases excess pressure by venting steam through the steam release valve/handle.
- Anti-Block Shield – A stainless steel cover which prevents food particles from entering the steam release pipe, reducing the risk of blockages.
- Safety Lid Lock – When cooker is pressurized, the lid will automatically lock to prevent opening the cooker. Do not attempt to force the lid open while the cooker is pressurized.
- Lid Position Detection – If the lid is not in a safe position for pressure cooking, the cooker will not allow cooking to begin.
- Automatic Temperature Control – Regulates heating to ensure the inner pot remains within a safe temperature range, based on the program.
- Overheat (Burn) Protection – Overheating may occur if:
• After Sautéing, inner pot has not been deglazed— food is stuck to the bottom
• The pressure cooker is being operated without sufficient cooking liquid
• The inner pot is not making full contact with the heating element
• The inner pot encounters a heat distribution issue, such as when starch accumulates on the bottom of the inner pot.
The cooker will reduce the risk of burning food by lowering the heat output. - Automatic Pressure Control – Maintains working pressure levels. Suspends heating if pressure exceeds pressure level limits.
- Electrical fuse – Cuts off power if the electrical current exceeds safety limits.
- Thermal Fuse – Cuts off power if the internal temperature exceeds safety limits.
- Leaky Lid Detection – If there is steam leakage from the lid (such as, sealing ring not installed, or steam release handle being in “Venting” and not “Sealing” position) the cooker will not pressurize. Loss of steam may cause food to burn. The cooker monitors the pre-heating time and lowers heat output if working pressure is not reached within 40 minutes.
- Self-Diagnostic – Scans components for errors. Displays error codes on-screen.
Safety Mechanisms - Instant Pot® Max
Safety Mechanisms - Instant Pot® Max
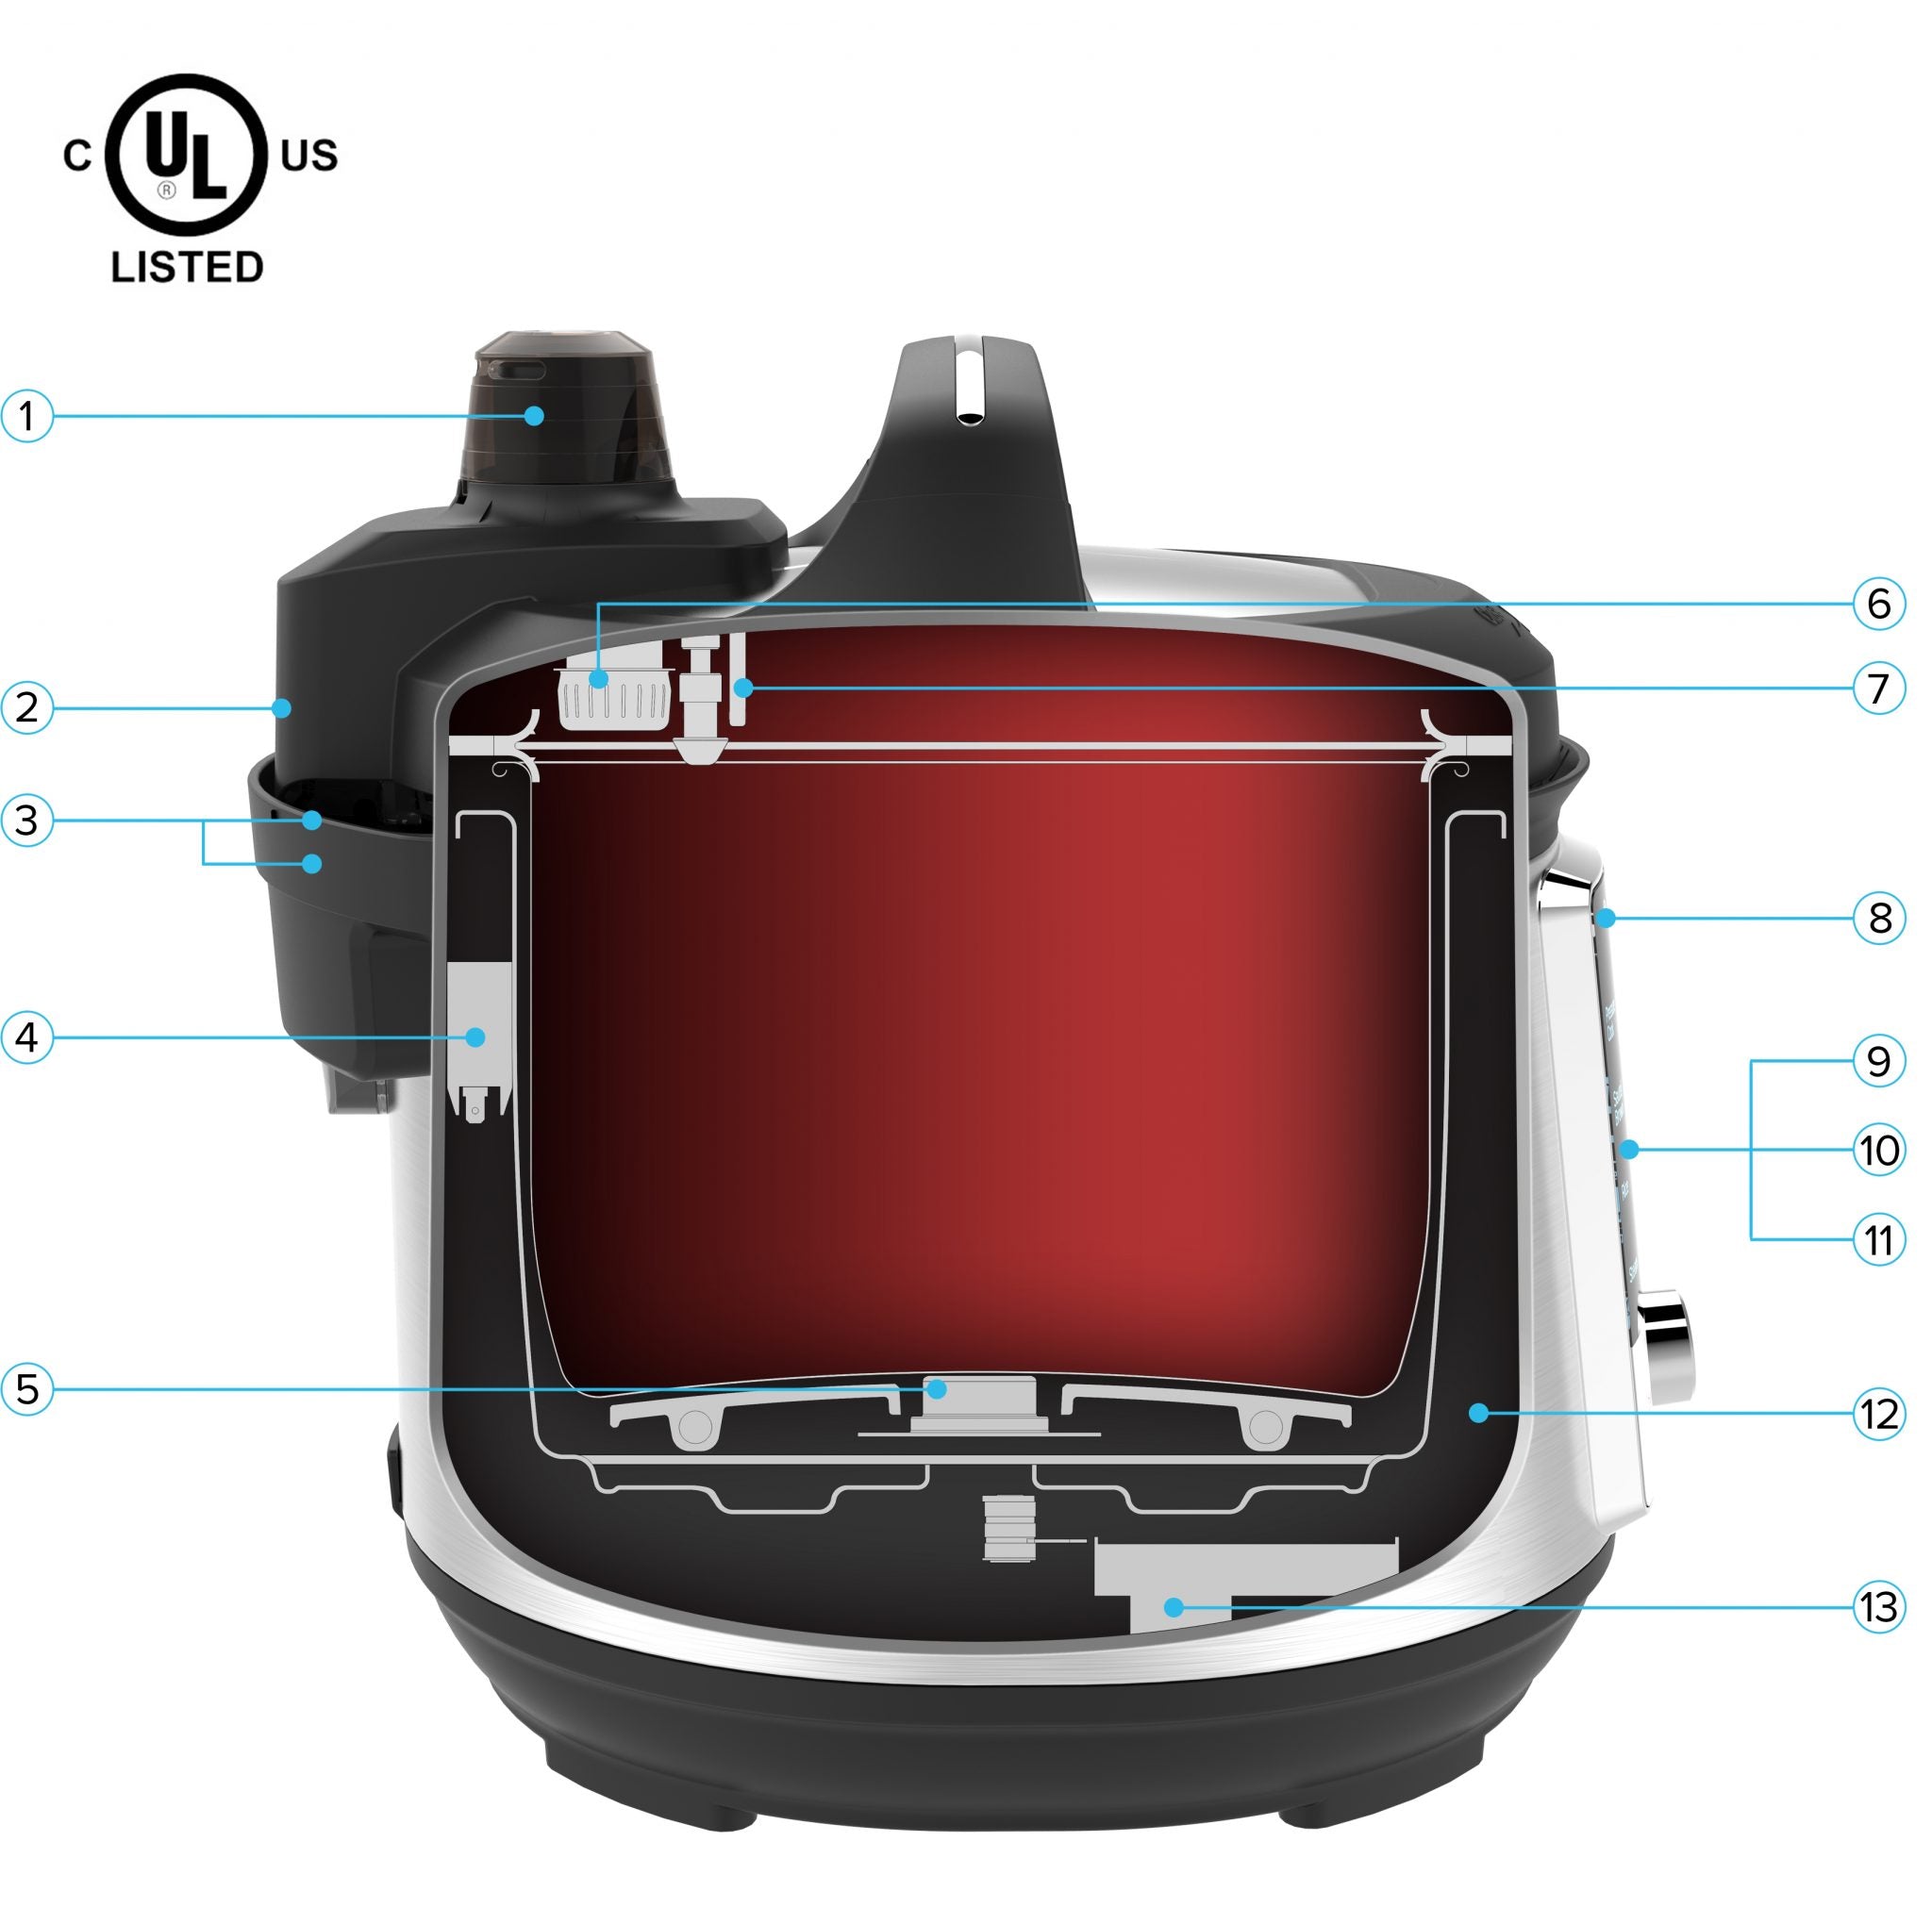
Instant Pot Max is designed with 13 Safety Mechanisms to eliminate many common errors which may cause harm or spoil food. Max 13 Safety Mechanisms are:
- Steam Release – Releases excess pressure by venting steam through the steam release valve/handle.
- Safety Lid Lock – When cooker is pressurized, the lid will automatically lock to prevent opening the cooker. Do not attempt to force the lid open while the cooker is pressurized.
- Wireless Lid Detection – Detects if the lid is present or not, as required by the selected program.
- Lid Position Detection – If the lid is not in a safe position for pressure cooking, the cooker will not allow cooking to begin.
- Overheat (Burn) Protection – Overheating may occur if:
• After Sautéing, inner pot has not been deglazed— food is stuck to the bottom
• The pressure cooker is being operated without sufficient cooking liquid
• The inner pot is not making full contact with the heating element
• The inner pot encounters a heat distribution issue, such as when starch accumulates on the bottom of the inner pot.
The cooker will reduce the risk of burning food by lowering the heat output. - Anti-Block Shield – A stainless steel cover which prevents food particles from entering the steam release pipe, reducing the risk of blockages.
- Automatic Pressure Control – Maintains working pressure levels. Suspends heating if pressure exceeds pressure level limits.
- Pressure Indicator – Indicator on control panel that illuminates when pressure is detected in the cooker. Do not attempt to force the lid open while the indicator is lit.
- Automatic Temperature Control – Regulates heating to ensure the inner pot remains within a safe temperature range, based on the program.
- Leaky Lid Detection – If there is steam leakage from the lid (such as, sealing ring not installed, or steam release handle being in “Venting” and not “Sealing” position) the cooker will not pressurize. Loss of steam may cause food to burn. The cooker monitors the pre-heating time and lowers heat output if working pressure is not reached within 40 minutes.
- Self-Diagnostic – Scans components for errors. Displays error codes on-screen.
- Thermal Fuse – Cuts off power if the internal temperature exceeds safety limits.
- Electrical Fuse – Cuts off power if the electrical current exceeds safety limits.
Care & Cleaning
Instant Pot® Products
Instant Pot® Products
The inner pot of the cooker (the stainless steel cooking pot), the sealing ring, the lid, and the steam rack are all dishwasher safe—yet another way in which your cooker makes cooking and cleanup extremely easy. Here is an overview of how best to care for and clean your Instant Pot®.
Prior to cleaning, ensure the cooker is unplugged and has cooled down.
Cooker Base and Heating Element

The cooker base is home to the microprocessor and the heating element essential to cooking.
Do Not Place in the Dishwasher! If the cooker base gets wet, allow it to dry completely. Contact the Customer Care team.
Clean the exterior of the cooker base with a damp cloth. You can use a slightly damp cloth to clean the inside of the cooker. It is however, important that the cooker be kept dry.
If you need to clean the area around the lip of the cooker, use a damp cloth or an old toothbrush to clean the edges.
Stainless Steel Inner Pot & Steam Rack

The inner pot and the steam rack are made of sturdy, food-grade stainless steel (304 – 18/8) and are entirelydishwasher safe. For the most part, you can keep the inner pot cleaned just as you would clean any stainless steelpot—by hand washing or the dishwasher.
Should the inner pot develop harmless water stains, non-abrasive scouring cleanser, made especially for cookingpots, brings back the original shine.
You can also periodically clean the inner pot by placing 1 cup of white vinegar in the bottom of the inner pot. Allow it to rest for 5 minutes, and then pour out the vinegar and rinse.
Removing Bluish Marks from Your Stainless Steel Inner Pot

Instant Pot’s inner pot (cooking pot) is stainless steel, food grade 304 (18/8) with no chemical coating. It is durable and will retain its appearance for years to come with proper care.
With stainless steel cookware it is not uncommon for a bluish or “rainbow” discoloration to appear on the inside of the pot, and Instant Pot’s inner pot is no exception. Minerals or salt in the food and water are the cause forthis discoloration. It may be easily removed by using a non-abrasive stainless steel cleaner, which will not only remove the marks it will help to retain the original brightness.
Another option is to cover the bottom with white vinegar. Allow the vinegar to sit for 5 minutes, remove, andrinse the inner pot. The discoloration marks should be removed completely.
For “White Hard Water” stains, they can be removed with a damp sponge soaked in vinegar or lemon.
We recommend avoiding steel wool, as it will scratch the surface. For additional information, verify “ eHow” or “British Stainless Steel Association”.
The images illustrate an Instant Pot® inner pot after an 8-month period of regular use and the results after using white vinegar to clean the stains.

Lid

The lid is top-rack dishwasher safe. It is best to remove the sealing ring and the anti-block shield so that the lid may be thoroughly cleaned. One way to prevent the lid from retaining odors is to place it upside down on the pot until it has completely dried or you are ready to use it. Verify the steam release valve and float valve, and make sure there is no food or other debris that would block them, and prevent your cooker from coming to pressure
Anti-block Shield

The anti-block shield underneath the lid should be removed and cleaned after each use, especially following the preparation of foods that may splatter.
To remove, using your thumb, push the side of the anti-block shield towards the lid rim and lift up. It may take a little effort, but the anti-block shield should pop out.
You can now wash the shield with warm, soapy water. Rinse, wipe dry with a soft cloth, and place back in position when dry. To position the anti-block shield in place, push down.
Sealing Ring

The sealing ring is made of high-quality, heat-resistant silicone. It can be hand-washed with soapy water or placed in the dishwasher. Allow the ring to dry completely before inserting back into the lid. Ensure the sealing ring is positioned in the lid after every wash, and that it is securely in place before you start cooking.
The sealing ring is critical in the functioning of your cooker. Inspect it carefully after it is washed. Any sign of cracking or other damage, replace the sealing ring. Replace only with Genuine Instant Pot® sealing rings, using other brands may void your Instant Pot® Warranty.
As silicone may pick-up food odors during cooking you may wish to have one sealing ring for savory and another for sweet foods.
Under normal conditions it should be fine for 18 – 24 months. If you notice cracks, leaking or deformation in the sealing ring, it should be replaced immediately. However, the sealing ring is porous and may absorb odors and become discolored. To avoid discoloration and odors, you may wish to change the sealing ring every 6 – 12months.
Condensation Collector

The condensation collector is to be removed and hand washed periodically. Allow to dry before replacing.
To Summarize
All parts of the Instant Pot® with the exception of the cooker base are dishwasher safe. This includes the stainless steel inner pot, the lid, the sealing ring, and the steam rack. The cooker base must be kept dry, and canbe wiped down with a damp cloth when necessary. The anti-block shield should be washed after each use and re-installed.
Instant Pot® Accu Slim, Sous Vide
Instant Pot® Accu Slim, Sous Vide
Allow to cool before cleaning, and dry thoroughly before storing.
Never clean with harsh chemical detergents, abrasive powders or scouring pads.
Removable Element Cover. Hand Wash only. Wash after each use in hot water with mild dish soap. Dry thoroughly before attaching to main body.
Main Body. Damp Wash only. Wipe body and display as needed with a soft, barely damp cloth or sponge.
Element. Damp Wash only. Wipe as needed with hot water and mild dish soap or vinegar. Dry thoroughly before replacing removable element cover.
WARNING! Do not immerse main body in water and do not attempt to cycle through dishwasher. Do not submerge power cord at any time. Do not wet prongs of detachable cord.
Instant™ Ace™ Blenders
Instant™ Ace™ Blenders
Clean blender, parts, and accessories after each use. Do not use harsh chemicals, scoring pads or other abrasive cleaners.
Cleaning Method Part Notes Dishwasher Safe Lid & Lid Cap
Remove lid cap from lid when cleaning.
Remove black silicone seal from lid periodically for cleaning.
150mL / 5oz Measuring CupIf dishwashing, place in top rack.Food TamperIf dishwashing, place in top rack.Strainer BagTurn inside out when cleaning, and spread open to dry.Cleaning BrushUse to clean under blades in pitcher Hand Wash Only Glass Pitcher
Do not wet bottom side of pitcher.
Ensure bottom of pitcher is dry before placing it on blender base.
Do not store food in the pitcher.
Blender Base
Unplug and wipe clean with a soft, damp cloth.
When in storage or not in use, do not fold the power cord.
Pulse Cleaning
Use Pulse/Clean to remove superficial food debris and residue from your pitcher.
- Remove the lid from the pitcher. Fill the pitcher with 1000mL / 34oz hot water. Secure the lid to the pitcher.
- Press Pulse/Clean to lift the majority of food contents.
- Discard dirty water after the last Pulse cycle has completed.
- Fill the pitcher with 1000mL / 34oz quart hot water and a squirt of dish soap, and press Pulse/Clean. Discard dirty water after the last cycle has completed.
- Rinse with warm, clear water.
Deep Cleaning
Minerals in water may deposit at the bottom of the pitcher. Periodic deep cleaning will ensure the longevity of the blender.
- Add 1 cup (250mL / 8oz) of white vinegar or citric acid, and 1 cup (250mL / 8oz) warm water to the pitcher.
- Allow the solution to sit for at least an hour, then press the Pulse/Clean key
- Empty the solution from the pitcher and rinse with warm, clear water.
For stubborn stains, unplug the blender and add 1 cup (250mL / 8oz) of white vinegar to the pitcher, then scrub with the cleaning brush. Repeat this process as necessary.
| Cleaning Method | Part | Notes |
| Dishwasher Safe | Lid & Lid Cap | Remove lid cap from lid when cleaning. Remove black silicone seal from lid periodically for cleaning. |
| 150mL / 5oz Measuring Cup | If dishwashing, place in top rack. | |
| Food Tamper | If dishwashing, place in top rack. | |
| Strainer Bag | Turn inside out when cleaning, and spread open to dry. | |
| Cleaning Brush | Use to clean under blades in pitcher | |
| Hand Wash Only | Glass Pitcher | Do not wet bottom side of pitcher. Ensure bottom of pitcher is dry before placing it on blender base. Do not store food in the pitcher. |
| Blender Base | Unplug and wipe clean with a soft, damp cloth. When in storage or not in use, do not fold the power cord. |
How to Download to Your Device
How to Download to Your Device
How to pair an Instant Pot® with a mobile device
You’ll only need to pair your device once, then it will remember your Instant Pot®. You may control multiple appliances from the same device.
Current App Version:
2.3.0 (June 2019)
Current Firmware Version:
1.0017 (June 2019) – required for Sous Vide Instant Start function
Check below tab ‘Using the App – New Firmware Update’ (Note: your Smart WiFi needs to be left plugged in and connected for a while to receive new Firmware notification.)
Supported Operating Systems:
iPhone and iPad: iOS 10, 11, 12, 13
Android™: 5.1, 6, 7, 8, 9, 10
Glossary of Terms
Glossary of Terms
Glossary of Terms
5-5-5 or 6-6-6: A method used to prepare eggs in your Instant Pot®. It refers to 5 minutes on high pressure, 5 minutes natural release and 5 minutes ice-bath prior to peeling.
Anti-Block Shield: The round metal part with 5 holes underneath the lid. It is designed to prevent food particles from interfering with the steam release valve. It should be removed and cleaned after each use, especially following the preparation of foods that may splatter. To remove using your thumb, push the side of the anti-block shield towards the lid rim and lift up. It may take a little effort, but the anti-block shield will pop out.
Burn: There may be insufficient water/broth in the inner pot, or food may be too close or stuck to the bottom of the inner pot with all the liquid on top.
Condensation Collector: The cup positioned at the rear of your Instant Pot®. It is used to capture any condensation that develops during cooking. Note: The Lux series does not include a condensation collector.
Cooker Base: Contains the microprocessor and the heating element. Never place anything on the inside of the cooker base without the stainless steel inner pot in position. The cooker base and lid must be kept away from external heat source, as it will damage the base and the lid.
Delay Start or Timer (older models): Sets the time delay before a cooking program starts.
Dual Pressure: The cooker includes both pressure settings low and high
EPC: Electric Pressure Cooker
Float Valve (Pin): The silver or red pin beside the steam valve, when it is up, your cooker is fully pressurized; when it drops it is no longer pressurized and you can open the cooker.
HP: High Pressure mode
LP: Low Pressure mode
Manual or Pressure Cook (newer models): Use Manual/Pressure Cook program to set custom time and/or pressure level when you pressure cook.
Natural Release (NR or NPR): Allow the cooker to cool down naturally until the float valve drops down. This may take 10 to 40 minutes, or even longer, depending on the amount of food in the cooker. After the cooking process is completed, the cooker will go into the “Keep Warm” mode if it has been turned ON.
PC: Pressure Cooker
PIP: Pot-in-Pot, refers to placing another pot inside your stainless steel inner pot to prepare a dish.
Quick Release (QR or QPR): Turn the Steam Release handle or press the Quick Release Button to the “Venting” position to let out steam until the float valve drops down. QR is not suitable for food with large liquid volume or high starch content such as: oatmeal, porridge, beans, sticky liquids, starchy soup, etc. as food content may splatter out, use Natural Release (NR) instead.
Sealing Ring: The silicone ring positioned underneath the lid. The sealing ring must be in position for the pressure cooker to come to pressure. Made of high-quality, heat-resistant silicone. The sealing ring is critical to the proper functioning of your Instant Pot®, it must always be positioned properly on the underside of the lid. Only use Genuine Instant Pot® sealing rings, other brands will void your warranty.
Sling: Used for PIP to easily remove the pot from the inner pot. Slings can be in silicone or aluminum foil.
Stainless Steel Inner Pot: The inner pot that is positioned inside the cooker base, where the food and liquid are placed. Made from food grade 304 (18/8) stainless steel, 3-ply bottom for even heat distribution, no chemical coating, compliant with FDA food safety standards. Dishwasher safe.
Steam Rack (Trivet): The steam rack is positioned inside the stainless steel inner pot. It is used to elevate food or your dish above the water in the bottom of the inner pot while you pressure cook.
Steam Release handle or Quick Release Button (Ultra): The valve that seals in or releases steam when you pressure cook. Ensure the valve is in the “Sealing” position. This is how the pressure cooker will come up to pressure. It is normal while building pressure for small amounts of steam to release through the knob. Turning the knob to “Venting” will release the pressure. The steam release handle does not lock tightly it will fit loosely on the lid.
Water Test (Initial Test Run): To help you become familiar with your Instant Pot® and to ensure the cooker is functioning properly.
Cooking Program Options
Cooking Programs (Up to 15 presets)
Cooking Programs (Up to 15 presets)
PRESSURE COOK/MANUAL – This is the setting you’re likely to use the most. The temperature, pressure levels, and cooking times can be controlled through the operation keys on the control panel. Here, press the Pressure Level key to adjust the pressure level and the +/- keys to change the cooking time
SOUP/BROTH – Brings soups to a slow simmer, and results in a clear broth. For meatless soups, use the Less mode; for soups with meat, use the Normal mode; for soups that requires longer cook times, such as rich bone broth, use the More mode.
MEAT/STEW – Best for cooking large cuts of meat at high pressure. For a soft texture, use the Less mode; for a very tender meat texture, use the Normal mode; for fall-off-the bone texture, use the More mode
BEAN/CHILI – Using this program results in different doneness levels for beans. For a firmer bean texture, use the Less mode; for a softer bean texture, use the Normal mode; for a very soft bean texture, use the More mode.
CAKE – This high-pressure mode creates a very moist, dense cake. For a lighter, moister cake, use the Less mode; for a denser cake, use the Normal mode; for a really dense cake, such as a New York Style cheesecake, use the More mode
EGG – This program is designed for cooking extra-large eggs, so you may need to adjust the time for smaller eggs. For a soft-cooked egg, use the Less mode; for a medium cooked egg, use the Normal mode; for a hard-cooked egg, use the More mode
SAUTÉ – Yes, you can sauté food in your Instant Pot® just as you would in a pan.
Use Less mode for simmering, thickening, reducing liquids and for foods that may burn easily; use Normal mode for searing; use More mode for browning and stir-frying. Remember, the maximum time for sauté is in 30 minute intervals as a safety precaution
SLOW COOK – Use the Less to correspond to a low (8 hour) slow cooker setting; use the Normal mode to correspond to a medium (6 hour) slow cooker setting; use the More mode to correspond to a high (4 hour) slow cooker setting
RICE – This program cooks on low pressure, and is best used for white rice. For rice with a firmer texture, use the Less mode; for rice with a normal texture, use the Normal mode; for rice with a softer texture, use the More mode.
MULTIGRAIN – Includes a presoaking time, and is best for brown rice, wild rice, and tougher whole grains. For a firmer texture, use the Less mode; for a normal texture, use the Normal mode; for a softer texture, use the More mode. The More setting includes the pre-soak prior to pressure cooking
PORRIDGE – Use the Less mode for Oatmeal; use the Normal mode for making rice porridge (congee); use the More mode for a porridge / congee that contains a mixture of beans or tougher grains
STEAM – For steaming vegetables, use the Less mode; for seafood and fish, use the
Normal mode; for meats, use the More mode. Always use the steam rack to elevate food above the water and use the QR (Quick Release) method to prevent overcooking the food
STERILIZE – This program is designed for sterilizing baby bottles, jars, and utensils. Use the Less mode to pasteurize dairy products; use the Normal mode for low pressure sterilization and canning of acidic fruits and vegetables; use the More mode for high pressure sterilization and canning of acidic fruits and vegetables
YOGURT – The Less mode is designed for Jiu Niang, a sweet fermented rice dish; the Normal mode is for fermenting milk when making yogurt, while the More mode is for pasteurizing milk
KEEP WARM – 3 temperatures to maintain food at different serving temperatures
Cooking Programs Option Chart
Cooking Programs Option Chart
Program |
Model |
Setting |
Cooking Option |
Notes |
|---|---|---|---|---|
| Bean/ Chili | All Series | Less | Firmer texture | Choose setting based on bean texture desired, or adjust cook time manually. When cooking beans or legumes, always use NR to release pressure. |
| Normal | Soft texture | |||
| More | Very soft texture | |||
| Cake | Lux, Duo Plus, Ultra (6 & 8 quart), Viva 6 quart | Less | Lighter moist cake | Adjust cook time as directed in recipe. |
| Normal | Denser moist cake | |||
| More | Cheesecakes | |||
| Egg | All Series | Less | Soft -boiled eggs | Pre-set times are intended for extra large eggs. Adjust cooking time to account for different sized eggs. Plunge eggs into ice bath to prevent overcooking. |
| Normal | Medium -boiled eggs | |||
| More | Hard-boiled eggs | |||
| Meat/ Stew | All Series | Less | Soft meat texture | Choose setting based on meat texture desired, or adjust cook time manually. Allow meat to “rest” for 5-30 minutes, depending on size. It will reabsorb cooking juices for tender, succulent meat. |
| Normal | Very soft meat texture | |||
| More | Fall-off-the-bone meat texture | |||
| Multigrain | All series (6 & 8 quart) | Less | Brown rice, wild rice, black beans, chickpeas, etc. | Select “Less” or “Normal” based on type of grain and desired texture. Ensure dry beans are completely submerged in water. |
| Normal | Brown rice, wild rice, mung beans, etc. | |||
| More | Tough grains or a mixture of grains and beans | Begins with 45 minutes of warm water soaking time prior to 60 minutes of pressure cooking. Ensure dry beans are completely submerged in water. | ||
| Porridge | All Series | Less | Oatmeal steel cut or rolled | Adjust time as directed in recipe. Always use NR to release pressure when cooking foods that expand. |
| Normal | White rice porridge/congee | |||
| More | Rice porridge/congee with a mixture of various grains | |||
| Poultry | Duo (6 & 8 quart), Nova Plus 6 quart | Less | Soft texture | Choose setting based on meat texture desired, or adjust cook time manually. Allow poultry to “rest” for 5-10 minutes, depending on size. It will reabsorb cooking juices for tender, succulent meat. |
| Normal | Very soft texture | |||
| More | Fall-off-the-bone texture | |||
| Pressure Cook or Manual | All Series | Manual programming | Press Pressure Level to toggle between High and Low pressure. Use + / - keys to adjust cook time. Adjust according to recipe or preferred cooking habits | |
| NA | ||||
| Rice | All Series | Less | Tender but firm to bite | For cooking medium and long-grain white rice. Use 10-Minute Natural Release after cooking for perfect results. |
| Normal | Normal texture white rice | |||
| More | Softer texture white rice | |||
| Sauté | All Series | Less | Simmering, thickening, and reducing liquids | The display switching from “Hot” to “On” indicates cooker is maintaining temperature. If recipe ingredients are added before “Hot” message appears, it may not appear at all. As a safety precaution, maximum time is 30 minutes and cannot be adjusted. |
| Normal | Pan searing or sautéing | |||
| More | Stir-frying or browning meat | |||
| Slow Cook | All Series | Less | Corresponds to LOW on most temperature controlled slow cookers | Follow recipe directions for slow cooking. For best results, use the Instant Pot tempered glass lid. If using the stainless steel lid, ensure steam release handle is set to “Venting” position. |
| Normal | Corresponds to MED on some temperature controlled slow cookers | |||
| More | Corresponds to HIGH on most temperature controlled slow cookers | |||
| Soup/ Broth | All Series | Less | Soup without meat | Liquid remains clear due to lack of boiling motion. Due to high liquid content of most soups, always use NR to release pressure. |
| Normal | Soup with meat | |||
| More | Rich bone broth | |||
| Steam | All Series | Less | Vegetables | Use steam rack provided to elevate food from cooking liquid. Use QR to prevent food from overcooking. |
| Normal | Fish and seafood | |||
| More | Meat | |||
| Sterilize | Duo Plus, Ultra (6 & 8 quart), Viva 6 quart | Less | No pressure steam sterilization | Suitable for tempered glass and heat-resistant plastics. |
| Normal | Sterilization of baby bottles, jars, utensils and water-bath canning of acidic fruits and vegetables. | Low pressure hot water bath canning. | ||
| More | Sterilization of baby bottles, jars, utensils and water-bath canning of acidic fruits and vegetables. | High pressure hot water bath canning. | ||
| Yogurt | Duo, Duo Plus, Ultra, Viva, Nova Plus, Smart Bluetooth | Less | For Jiu Niang, a sweet fermented glutinous rice dessert | Default fermentation time is 24:00 hours.Adjust time based on recipe. Default fermentation time is “08:00” hours Adjust as desired up to “99:30” hours. |
| Normal | Fermenting milk after culture has been added | 'Yogt' will be displayed on the screen when completed. | ||
| More | Pasteurizing milk | ‘boiL’ will be displayed on-screen while Smart Program is running ‘yogt’ will be displayed on the screen when completed |
Where to Buy
United States (US)
United States (US)
 |
||||
Canada
Canada
United Kingdom (UK)
United Kingdom (UK)
Product Recall Notices
Instant Pot Smart Recall Notice
Instant Pot Smart Recall Notice
***************IP-LUX and IP-DUO models are NOT affected*******************
Dear Instant Pot SMART Owner,
Last night we found out about a manufacturing issue with “Instant Pot SMART” (the new Bluetooth enabled model, sold only in the US and Canada). After extensive use this issue may lead to electrical leakage from the thermal probe (the shiny, elevated component in the middle of the heating element). As a result, this may cause an electrical shock. This problem is estimated to occur in only about 3~4 in a thousand units.
Other Instant Pot models (IP-DUO, IP-LUX and IP-CSG) are NOT affected.
“IP” stands for “Instant Pot”, “50” or “60” relates to the size, ie 5 or 6 quart/liter. ONLY the “Smart-60” model with a Datecode between 1410 and 1503, purchased before June 1, 2015, is affected.
To avoid any risk, please stop using your Instant Pot SMART. Please RETAIN your unit until further instructions.
We are very sorry for the inconvenience this may cause you. Your Instant Pot SMART will be replaced at no cost to you. On the bright side, this will upgrade the firmware in your Instant Pot SMART. This recall is applicable for IP-Smart purchased before June 1, 2015.
We will contact you again via email about the replacement process. If you didn’t receive the recall email, please contact our support team at support@instantpot.com. In the mean time, if you have any questions or wish to get updates about this or other announcements, feel free to follow our Facebook page here: https://www.facebook.com/instantpot
Our new “Instant Pot Community” Facebook group is a great source for information, you may join in the conversation here: https://www.facebook.com/groups/InstantPotCommunity/
If you purchased the Instant Pot SMART for others, please alert them to this information.
Best regards,
The Instant Pot Team
support@instantpot.com